End-To-End Type-Safety with GraphQL, Prisma & React: Codegen & Deployment

In this series you are learning how to implement end-to-end type safety using React, GraphQL, Prisma, and some other helpful tools that tie those three together.
Table Of Contents
- Introduction
- Set up GraphQL Codegen
- Write a GraphQL Query
- Generate types using GraphQL Codegen
- Replace the manually entered types
- Install and set up urql
- Query your data
- Push your projects to Github
- Deploy the API
- Deploy the React application
- Summary & Final thoughts
Introduction
In this final section of the series, you will set up the final piece of the end-to-end type safety puzzle: code generation! This will allow you to keep your types in sync across the API and frontend client, as well as allow you to safely query data over the network. Finally, you will deploy your application!
Set up GraphQL Codegen
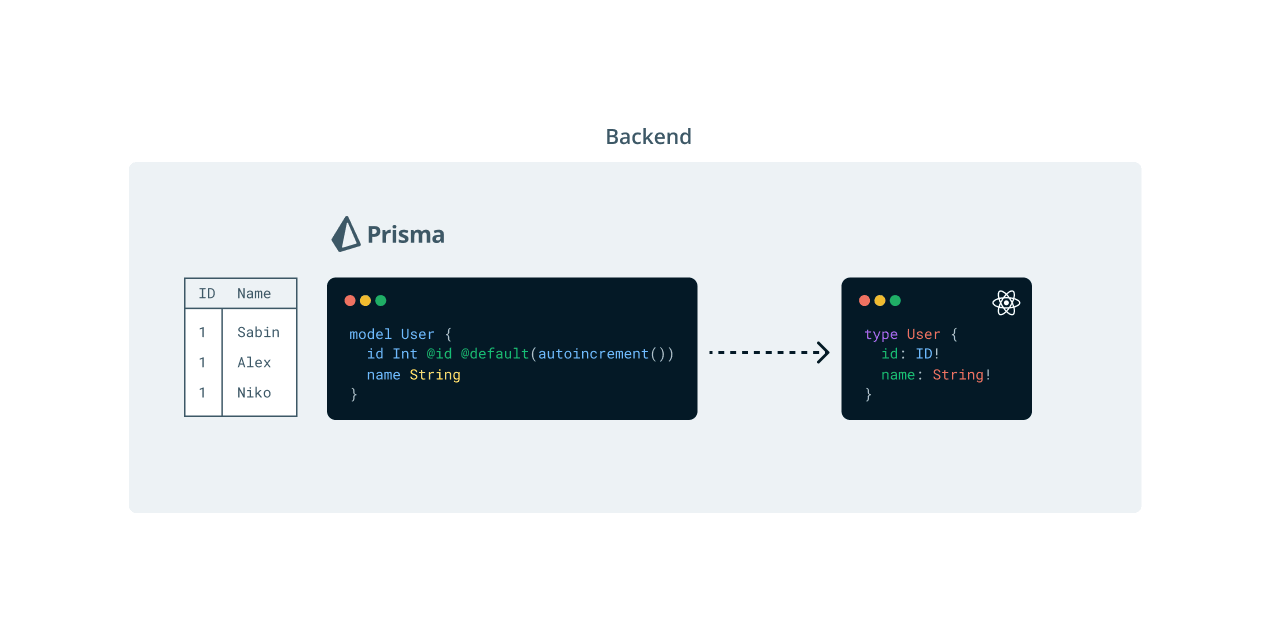
Currently, Prisma generates a set of TypeScript types based off of your database schema. Pothos uses those types to help build GraphQL type definitions. The result of those two pieces is a GraphQL schema:
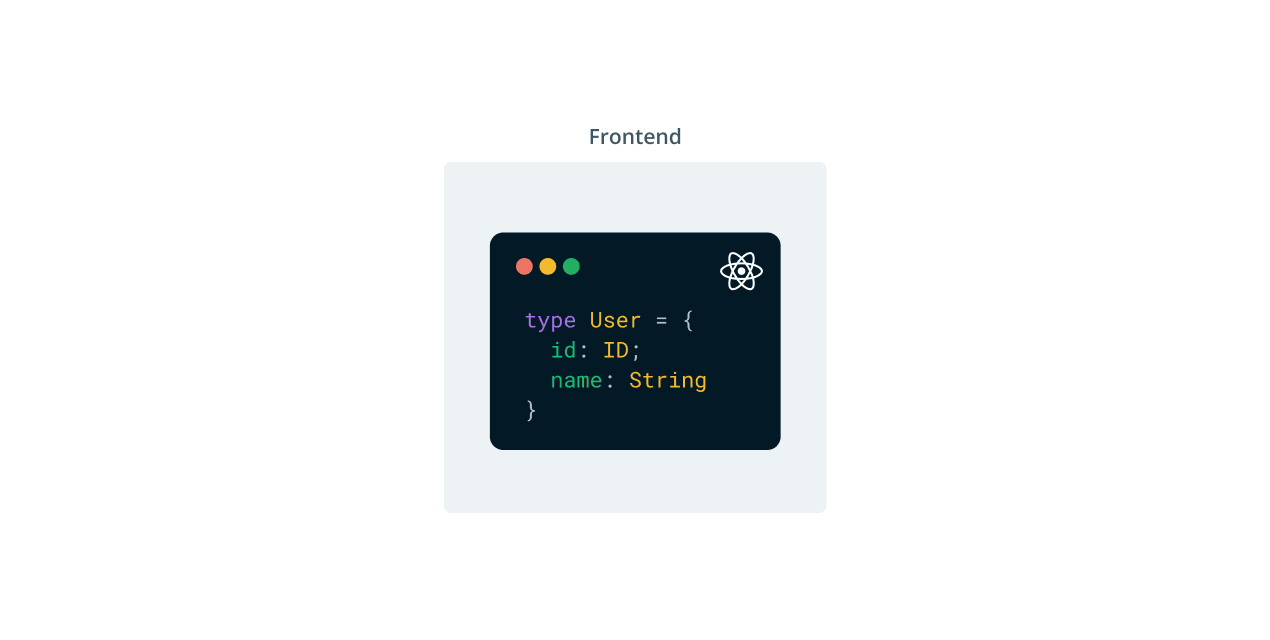
Your frontend project currently has a set of manually defined types, which were built in the first section of this series. These are "compatible with" the types in your API, but not directly related:
Until now, this worked fine. But what happens if a new field is introduced, updated, or removed form the API? Your frontend application would have no idea a change occurred in the API and the type definitions in the two projects would become out of sync.
How can you be sure a user object you retrieve over the network, for example, will contain all of the fields your React application is expecting? This is where GraphQL Codegen comes in:
GraphQL Codegen will generate TypeScript types and query helpers in your React project based off of your GraphQL schema and the queries you write in your frontend application.
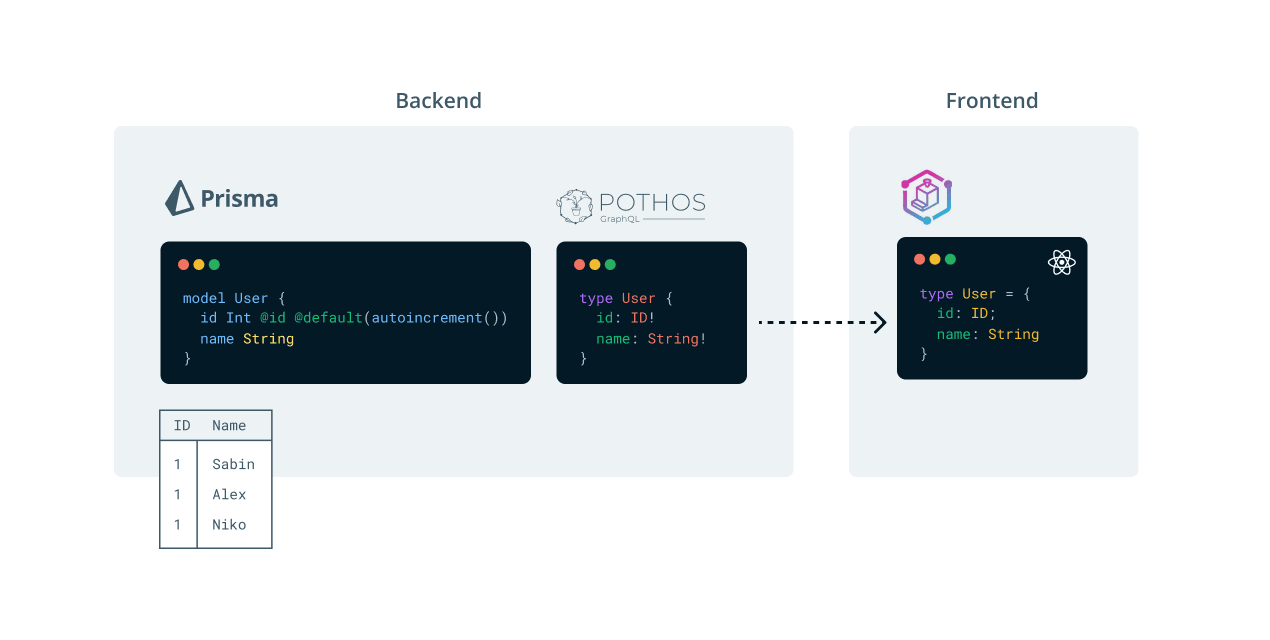
So the entire flow of types across your application will be as follows:
- Prisma will generate types based off of your database schema.
- Pothos will use those types to expose GraphQL types via an API.
- GraphQL Codegen will read your GraphQL schema and generate types for your frontend codebase representing what is available via the API and how to interact with it.
Installation
To get started, navigate into your React application's codebase via the terminal:
cd react-clientYou will need a few different packages to set up GraphQL Codegen. Run the following to install the packages needed:
npm i graphql
npm i -D @graphql-codegen/cli @graphql-codegen/typed-document-node @graphql-codegen/typescript @graphql-codegen/typescript-operations
Here's a brief overview of why each of these packages are needed:
graphql: The library that allows you to use GraphQL.@graphql-codegen/cli: The CLI tool that allows you to use different plugins to generate assets from a GraphQL API.@graphql-codegen/typescript: The base plugin for GraphQL Codegen TypeScript-based plugins. This plugin takes your GraphQL API's schema and generates TypeScript types for each GraphQL type.@graphql-codegen/typescript-operations: The GraphQL Codegen plugin that generates TypeScript types representing queries and responses based on queries you've written.@graphql-codegen/typed-document-node: The GraphQL Codegen plugin that generates an Abstract Syntax Tree (AST) representation of any queries you've written.
Note: Don't worry too much about the nitty-gritty of these plugins. Just know that they generate TypeScript types for each GraphQL object, query and mutation type in your GraphQL schema and help make your API request type-safe.
Configuring the plugins
Now that those plugins are installed and you have a general idea of what they do, it's time to configure them.
At the root of your project, create a new file named codegen.yml. This will hold the configurations for GraphQL Codegen:
touch codegen.ymlThere will be three configurations to fill out in this file:
schema: The URL of your GraphQL schemadocuments: A blob that finds any.graphqlfile in your codebasegenerates: The configuration that tells GraphQL Codegen what to generate and which plugins to use
# codegen.yml

schema: http://localhost:4000/graphql
documents: "./src/**/*.graphql"
generates:
  ./src/graphql/generated.ts:
    plugins:
      - typescript
      - typescript-operations
      - typed-document-node
This configuration file lets GraphQL Codegen know a GraphQL schema is available at localhost:4000/graphql, where to find your queries, and where to output the generated types using all of the plugins you installed.
In order to actually generate the types, however, you will need to set up a script to run the generation command. Add the following script to package.json:
// package.json
{
  // ...
  "scripts": {
    // ...
    "codegen": "graphql-codegen"
  }
  // ...
}
This provides a way for you to actually generate your types! You aren't quite ready yet, however.
GraphQL Codegen won't be able to generate any types for your GraphQL queries if you don't have any queries!
Write a GraphQL query
To keep things organized, you will write your queries in individual files within a graphql folder. Go ahead and create that folder within the src directory:
mkdir src/graphqlYou will only need one query for this application, which will retrieve the a list of users and their messages. Create a new file within the graphql directory named users.query.graphql:
touch src/graphql/users.query.graphqlYour applicaiton only needs a few pieces of information from the API: Each user's name and their messages body data.
Write the following GraphQL query for that data:
# src/graphql/users.query.graphql

query GetUsers {
  users {
    name
    messages {
      body
    }
  }
}
Generate types using GraphQL Codegen
Now that you have a query to work with, you can generate the types representing your query, the response, and the types available via your API!
Run the script you set up previously:
Note: Make sure your GraphQL API is up and running before running the command below! You can use
npm run devwithin the API's directory to start the server.
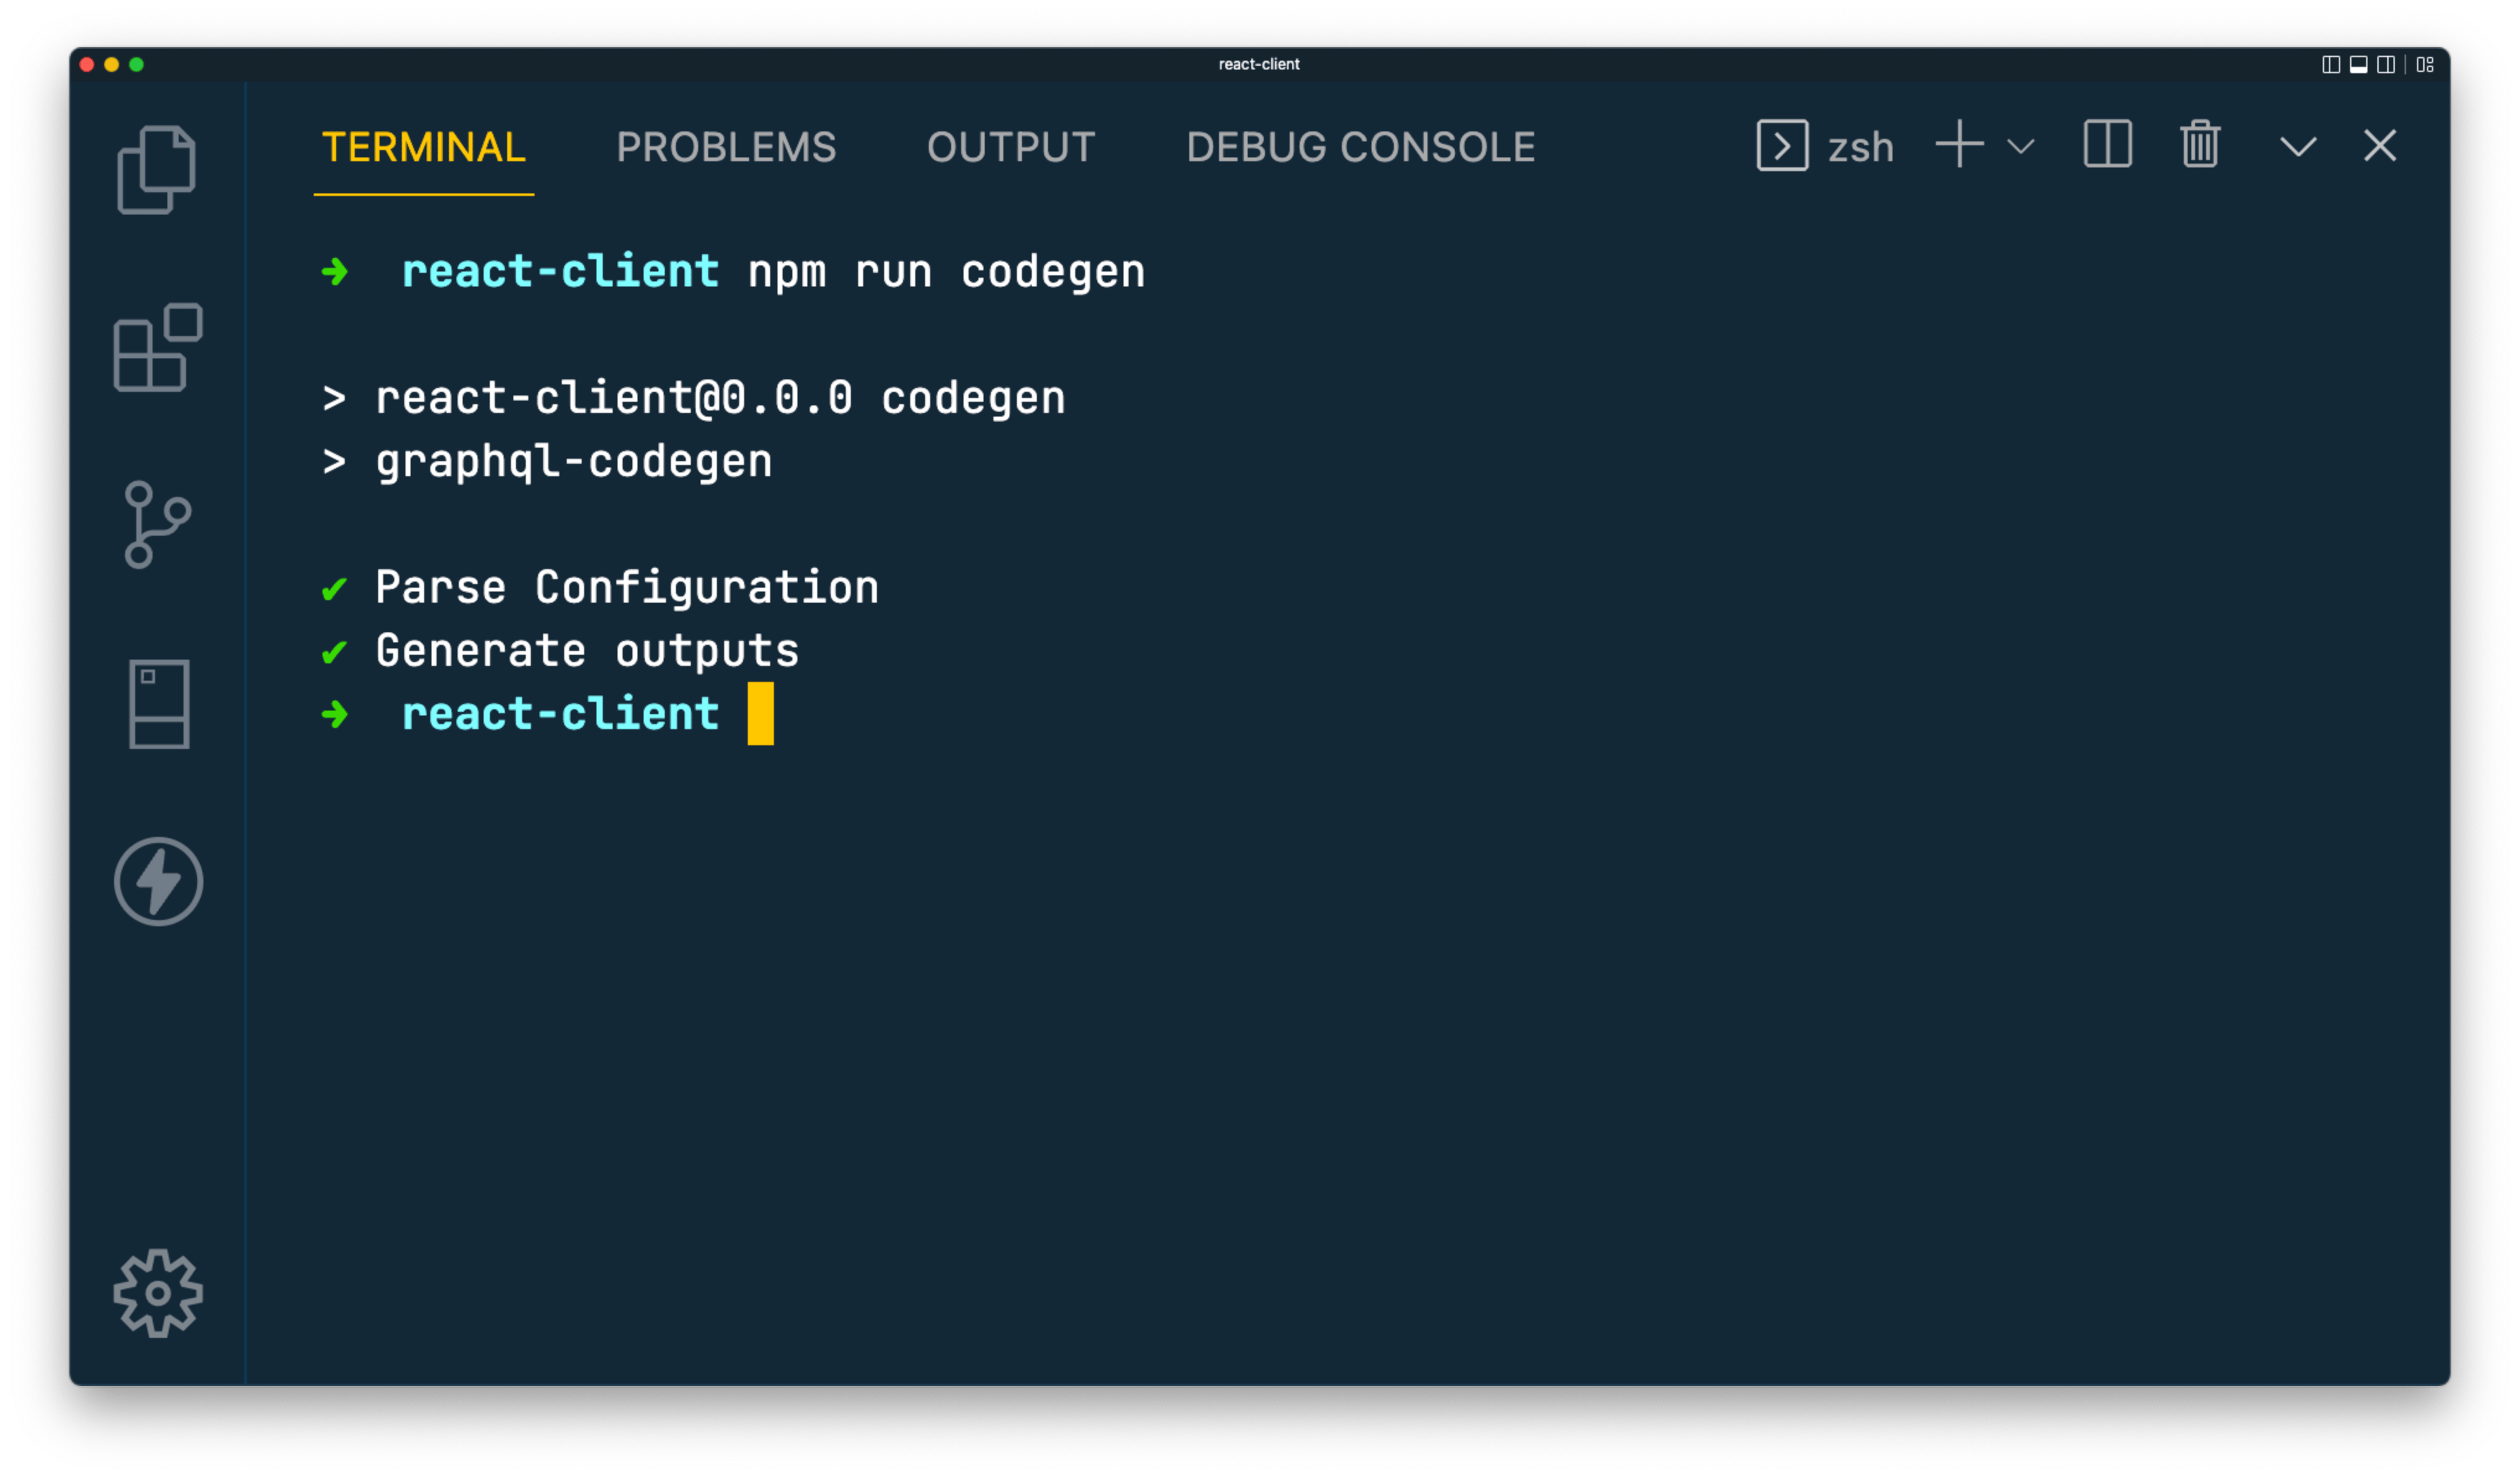
npm run codegenYou should see output similar to this:
As configured in your codegen.yml file, you will find a new file in src/graphql named generated.ts.
This file contains the generated types. Below are the types and objects generated from each plugin:
export type Maybe<T> = T | null;
export type InputMaybe<T> = Maybe<T>;
export type Exact<T extends { [key: string]: unknown }> = { [K in keyof T]: T[K] };
export type MakeOptional<T, K extends keyof T> = Omit<T, K> & { [SubKey in K]?: Maybe<T[SubKey]> };
export type MakeMaybe<T, K extends keyof T> = Omit<T, K> & { [SubKey in K]: Maybe<T[SubKey]> };
/** All built-in and custom scalars, mapped to their actual values */
export type Scalars = {
  ID: string;
  String: string;
  Boolean: boolean;
  Int: number;
  Float: number;
  Date: any;
};

export type Message = {
  __typename?: 'Message';
  body: Scalars['String'];
  createdAt: Scalars['Date'];
  id: Scalars['ID'];
};

export type Query = {
  __typename?: 'Query';
  users: Array<User>;
};

export type User = {
  __typename?: 'User';
  id: Scalars['ID'];
  messages: Array<Message>;
  name: Scalars['String'];
};
export type GetUsersQueryVariables = Exact<{ [key: string]: never }>;
export type GetUsersQuery = {
__typename?: "Query";
users: Array<{
__typename?: "User";
name: string;
messages: Array<{ __typename?: "Message"; body: string }>;
}>;
};export const GetUsersDocument = {
kind: "Document",
definitions: [
{
kind: "OperationDefinition",
operation: "query",
name: { kind: "Name", value: "GetUsers" },
selectionSet: {
kind: "SelectionSet",
selections: [
{
kind: "Field",
name: { kind: "Name", value: "users" },
selectionSet: {
kind: "SelectionSet",
selections: [
{ kind: "Field", name: { kind: "Name", value: "name" } },
{
kind: "Field",
name: { kind: "Name", value: "messages" },
selectionSet: {
kind: "SelectionSet",
selections: [
{ kind: "Field", name: { kind: "Name", value: "body" } },
],
},
},
],
},
},
],
},
},
],
} as unknown as DocumentNode<GetUsersQuery, GetUsersQueryVariables>;These types and objects are exact representations of your GraphQL API and the queries you've written and are what will bridge the gap between your API and your client.
Replace the manually entered types
Now that you have types generated from the API itself, you will replace your manually written types with those types.
Head over to src/types.ts. At the very top of that file import the GetUsersQuery type from src/graphql/generated.ts:
// src/types.ts

import type { GetUsersQuery } from "./graphql/generated";

// ...
The reason you import this type instead of the full User and Note types is that the GetUsersQuery type has access to a more specific set of types that contain only the fields your query retrieves.
Replace the existing types in that file with the following to expose the types representing your query results:
// src/types.ts
import type { GetUsersQuery } from "./graphql/generated";

export type Message = GetUsersQuery["users"][0]["messages"][0];
export type User = GetUsersQuery["users"][0];
If you head over to src/components/UserDisplay.tsx and inspect the type being used for the user prop, you will now see it uses the type generated from your GraphQL query and API:
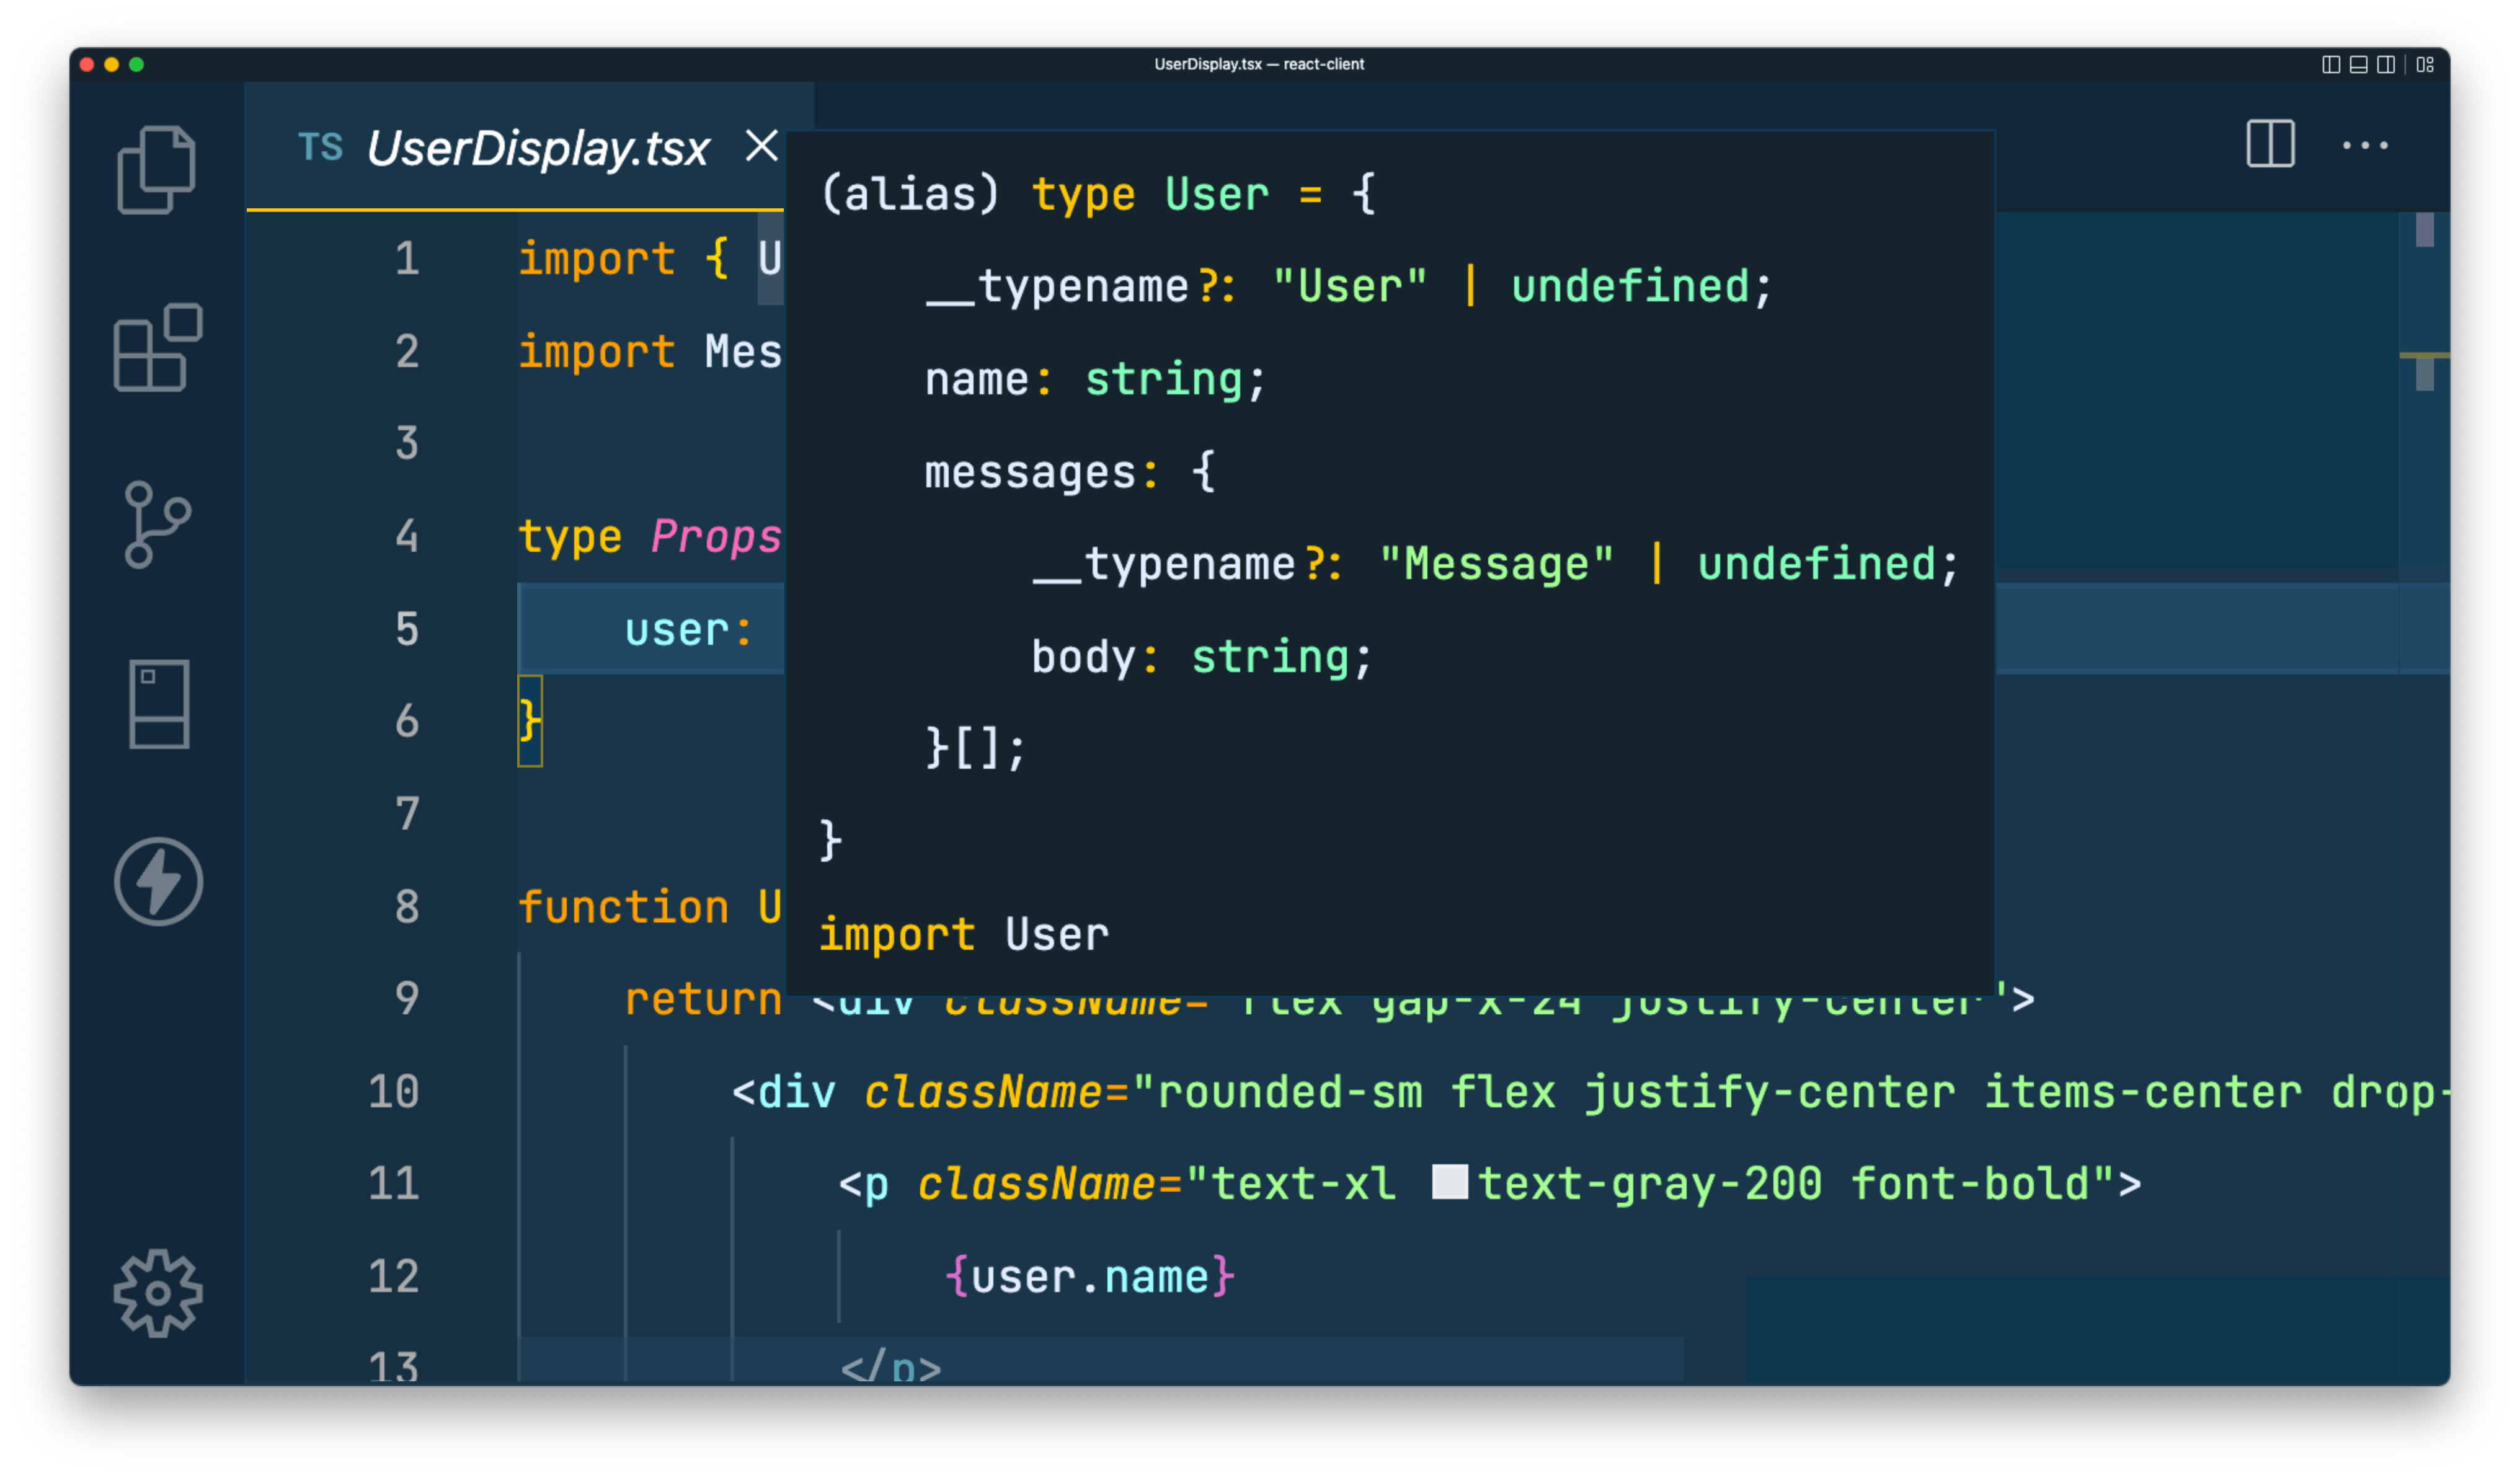
You now have almost every piece of the end-to-end type-safety puzzle put in place. Your types are in sync from your database all the way to your frontend application.
The only thing missing is actually digesting your API rather than using static data. You will want to do this in a type-safe way to ensure you are querying only for data that exists in your API and retrieving all of the fields your frontend expects.
GraphQL Codegen already generated the types and query objects required to do this. You just need to use them!
Install and set up urql
To query your GraphQL API you will use urql, a GraphQL client library that allows you to easily query a GraphQL API and integrates with React.
You will first need to install the dependency:
npm i urqlThis library provides you with two exports you will need: A Provider component and a createClient function.
You will need to use the Provider and createClient functions to provide urql to your application. In src/main.tsx, import those from the urql library:
// src/main.tsx

// ...
import { createClient, Provider } from 'urql';

// ...
Next, use the createClient function to create an instance of the urql client. The client takes in a configuration object with a url key, which points to your GraphQL API's url.
While developing locally this should be http://localhost:4000/graphql, however once the API is deployed this will need to change. Use an environment variable allow you to provide an API url via the environment, while falling back to the localhost URL in development:
// src/main.tsx

// ...

const client = createClient({
  url: import.meta.env.VITE_API_URL || 'http://localhost:4000/graphql',
});

// ...
The last step to provide urql to your application is to wrap your App component in the urql Provider component and pass that component the instantiated client:
diff
// src/main.tsx

import React from 'react'
import ReactDOM from 'react-dom/client'
import App from './App'
import './index.css'
import { createClient, Provider } from 'urql';

const client = createClient({
  url: import.meta.env.VITE_API_URL || 'http://localhost:4000/graphql',
});

ReactDOM.createRoot(document.getElementById('root') as HTMLElement).render(
  <React.StrictMode>
+    <Provider value={client}>
      <App />
+    </Provider>
  </React.StrictMode>
)
Query your data
You can now use urql to query your data! Head over to src/App.tsx and import the useQuery function from urql. Also import the GetUsersDocument object from graphql/generated.ts, as this will contain the AST representation of your query:
// src/App.tsx

// ...

import { useQuery } from 'urql'
import { GetUsersDocument } from './graphql/generated'

// ...
Within the App function, you can now replace the static variable and data with the following query:
// src/App.tsx

// ...

function App() {
  const [results] = useQuery({
    query: GetUsersDocument
  })

  // ...
}

// ...
This uses the GetUserDocument query object to request data from your API and return it in a properly typed variable.
You no longer need the User type import because the typing is already being specified in the GetUsersDocument object. You will also need to adjust the code used to map over each user in the JSX, as the query results are now returned in a nested object. The resulting file should look as follows:
// src/App.tsx
import UserDisplay from './components/UserDisplay'
import { useQuery } from 'urql'
import { GetUsersDocument } from './graphql/generated'
function App() {
const [results] = useQuery({
query: GetUsersDocument
})
return (
<div className="bg-zinc-800 flex-col h-screen w-full flex items-center justify-center p-4 gap-y-12 overflow-scroll">
{
results.data?.users.map((user, i) => <UserDisplay user={user} key={i}/>)
}
</div>
)
}
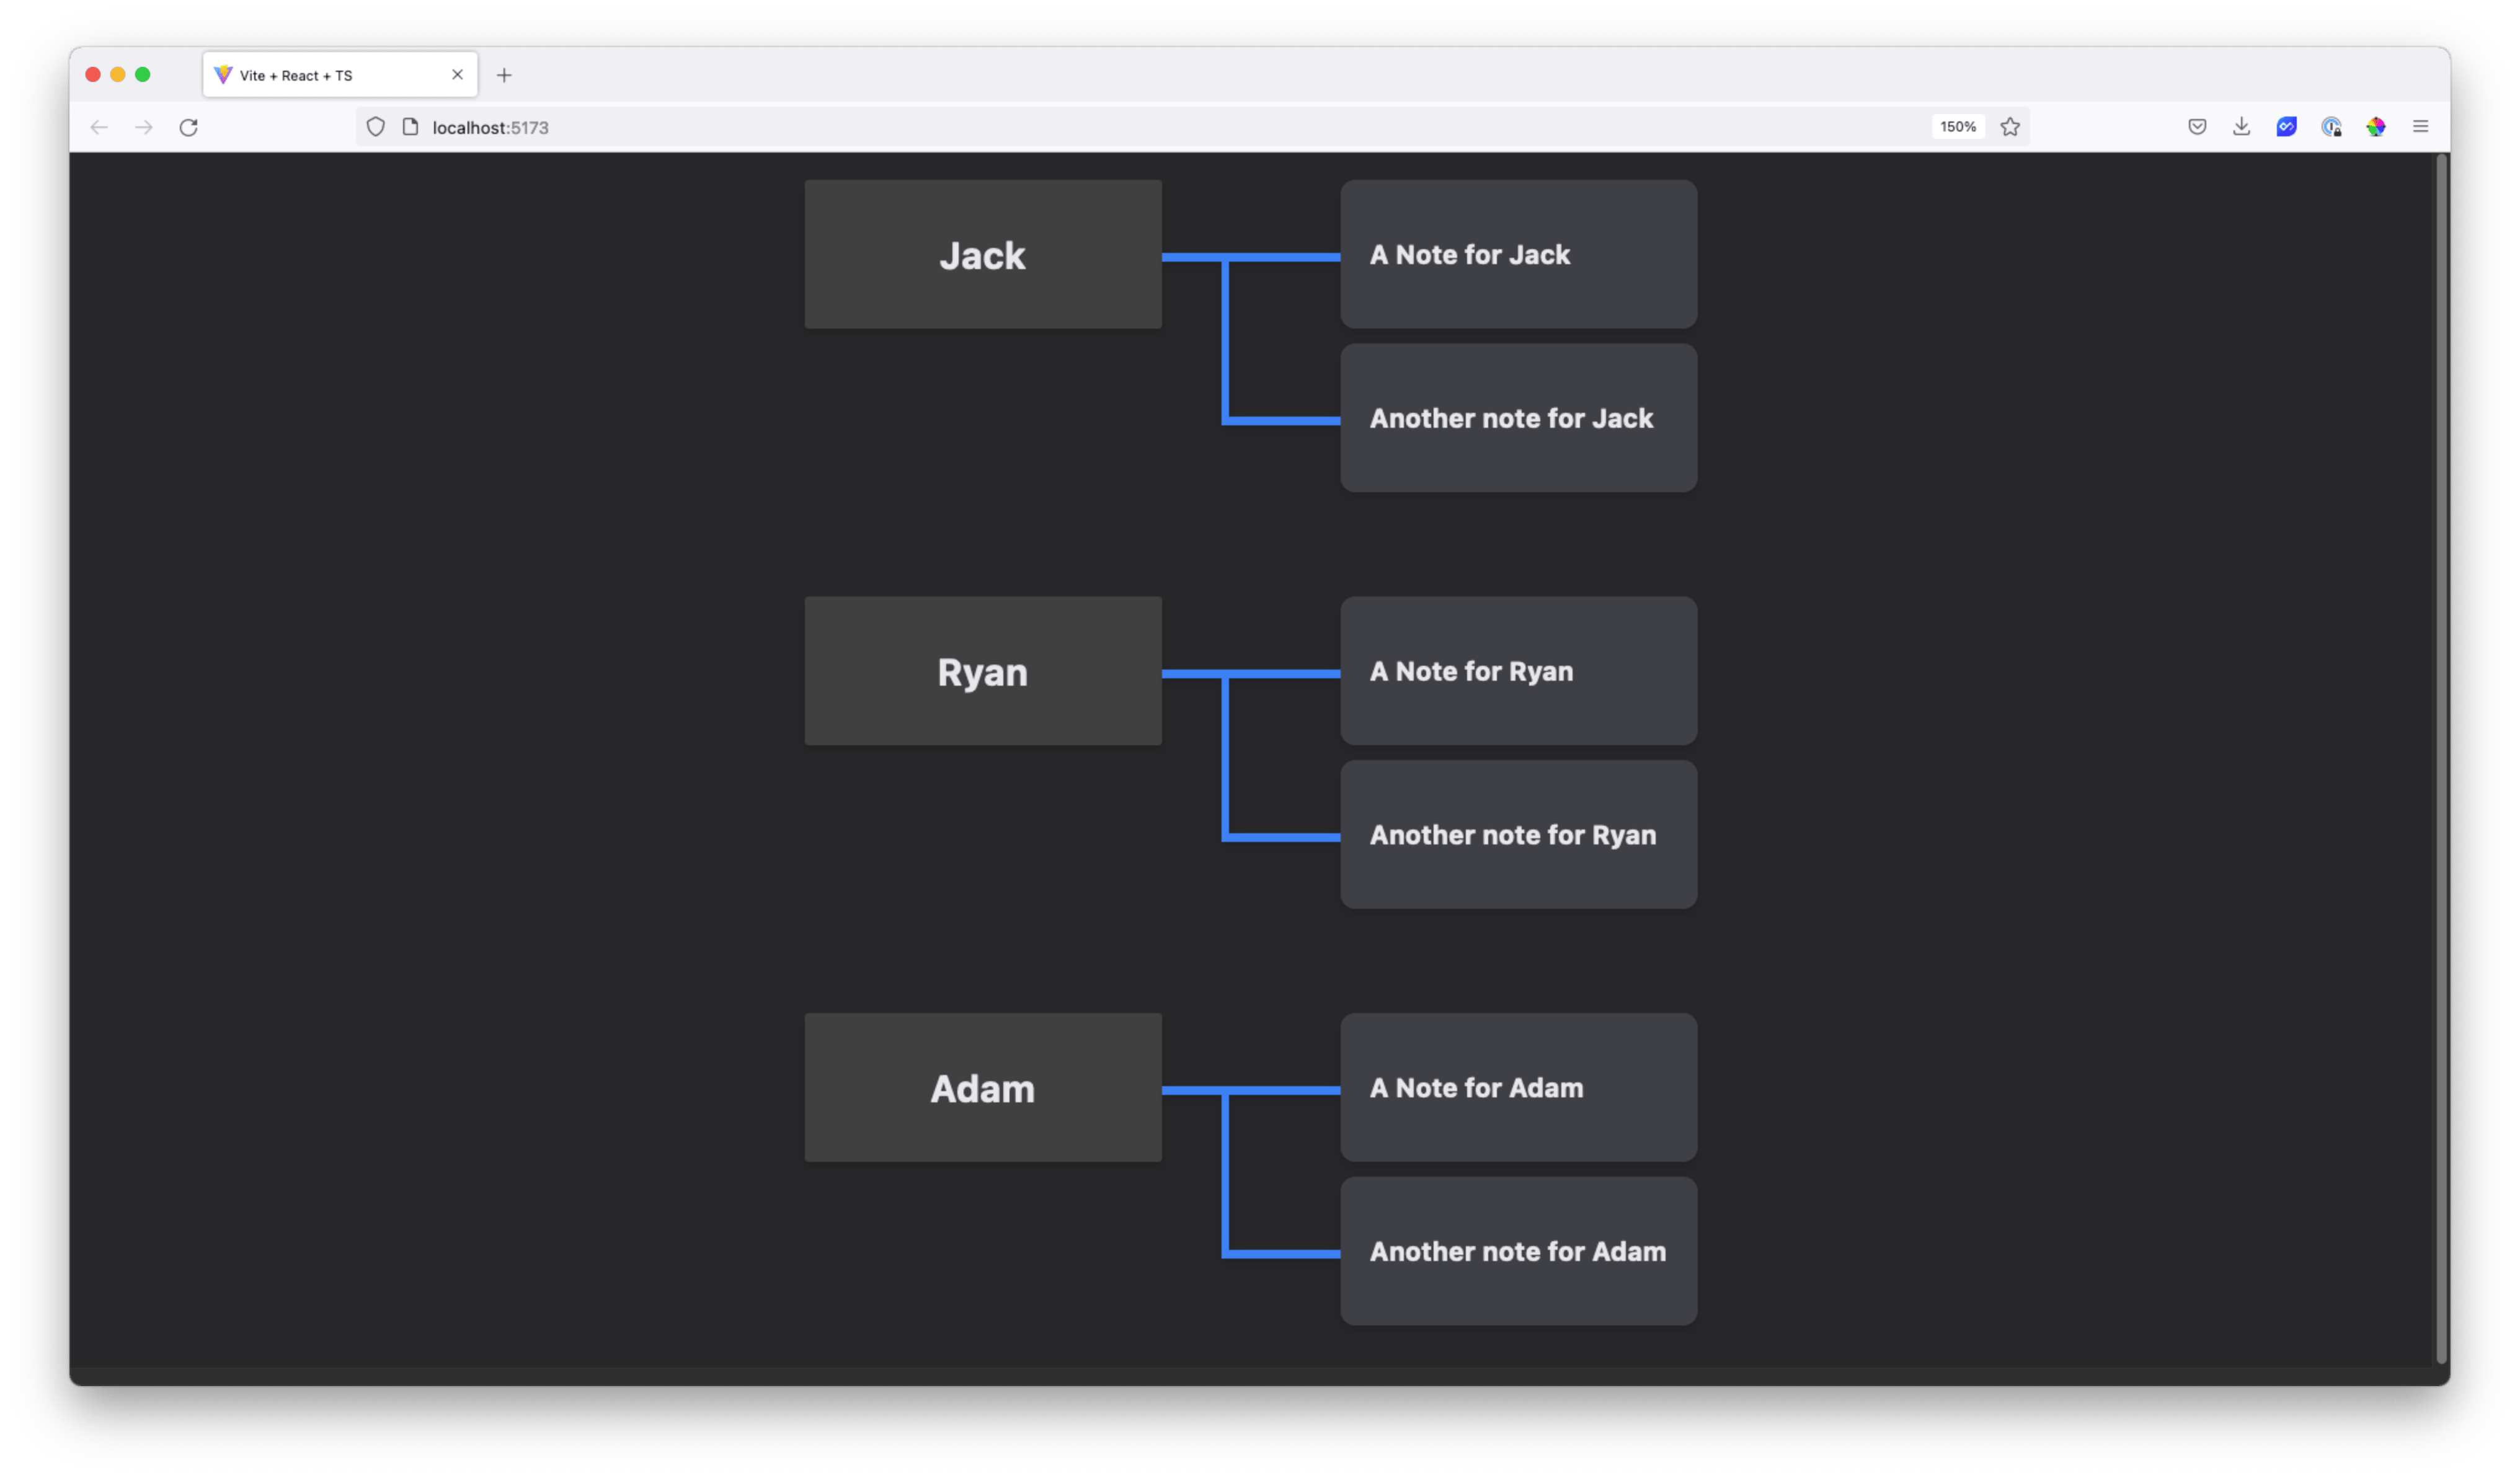
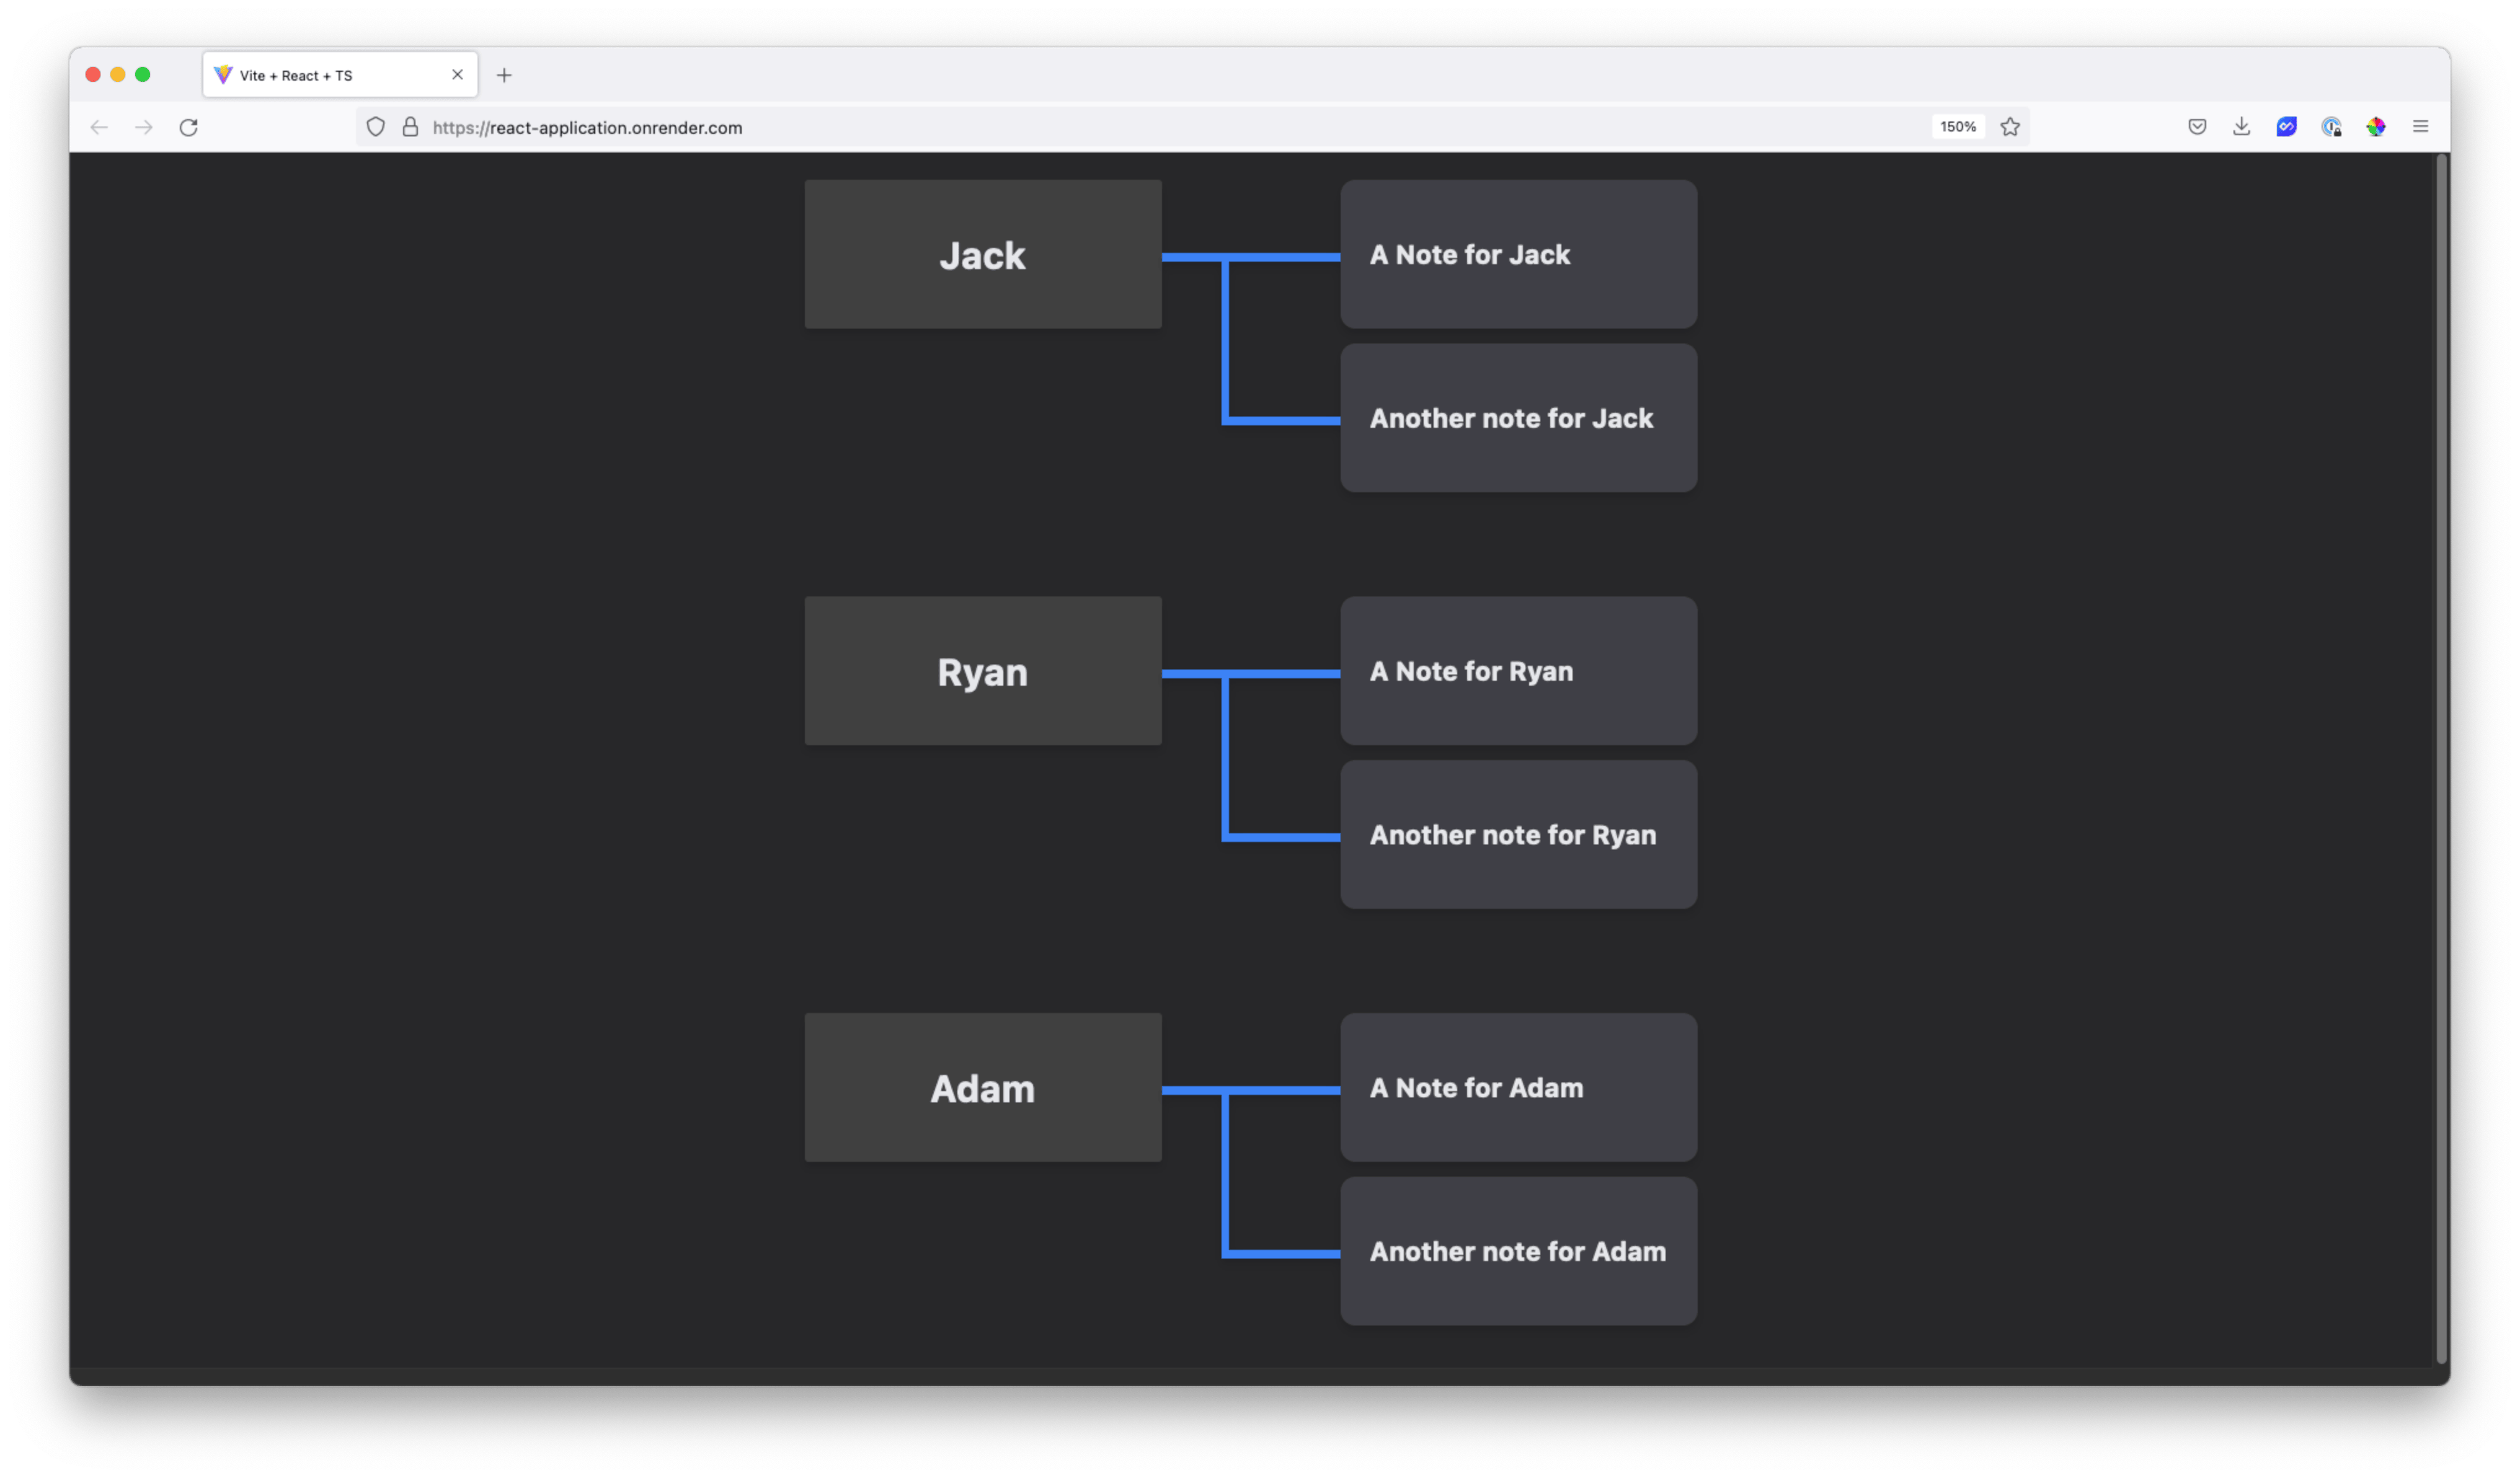
export default AppNotice your API request results are properly typed based off of the types within the API itself! If both your API and Client are running, head over to the browser. You should now see all of your data!
Congrats! 🎉 At this point, you have implemented a completely end-to-end type safe application with two separate pieces: an API and the client.
The only thing left to do is deploy the project so you can share it!
Push your projects to Github
You will be using Render to deploy both of your codebases. Before doing so, however, you need to host your code on Github.
Note: If you don't already have a Github account, you can create one for free here.
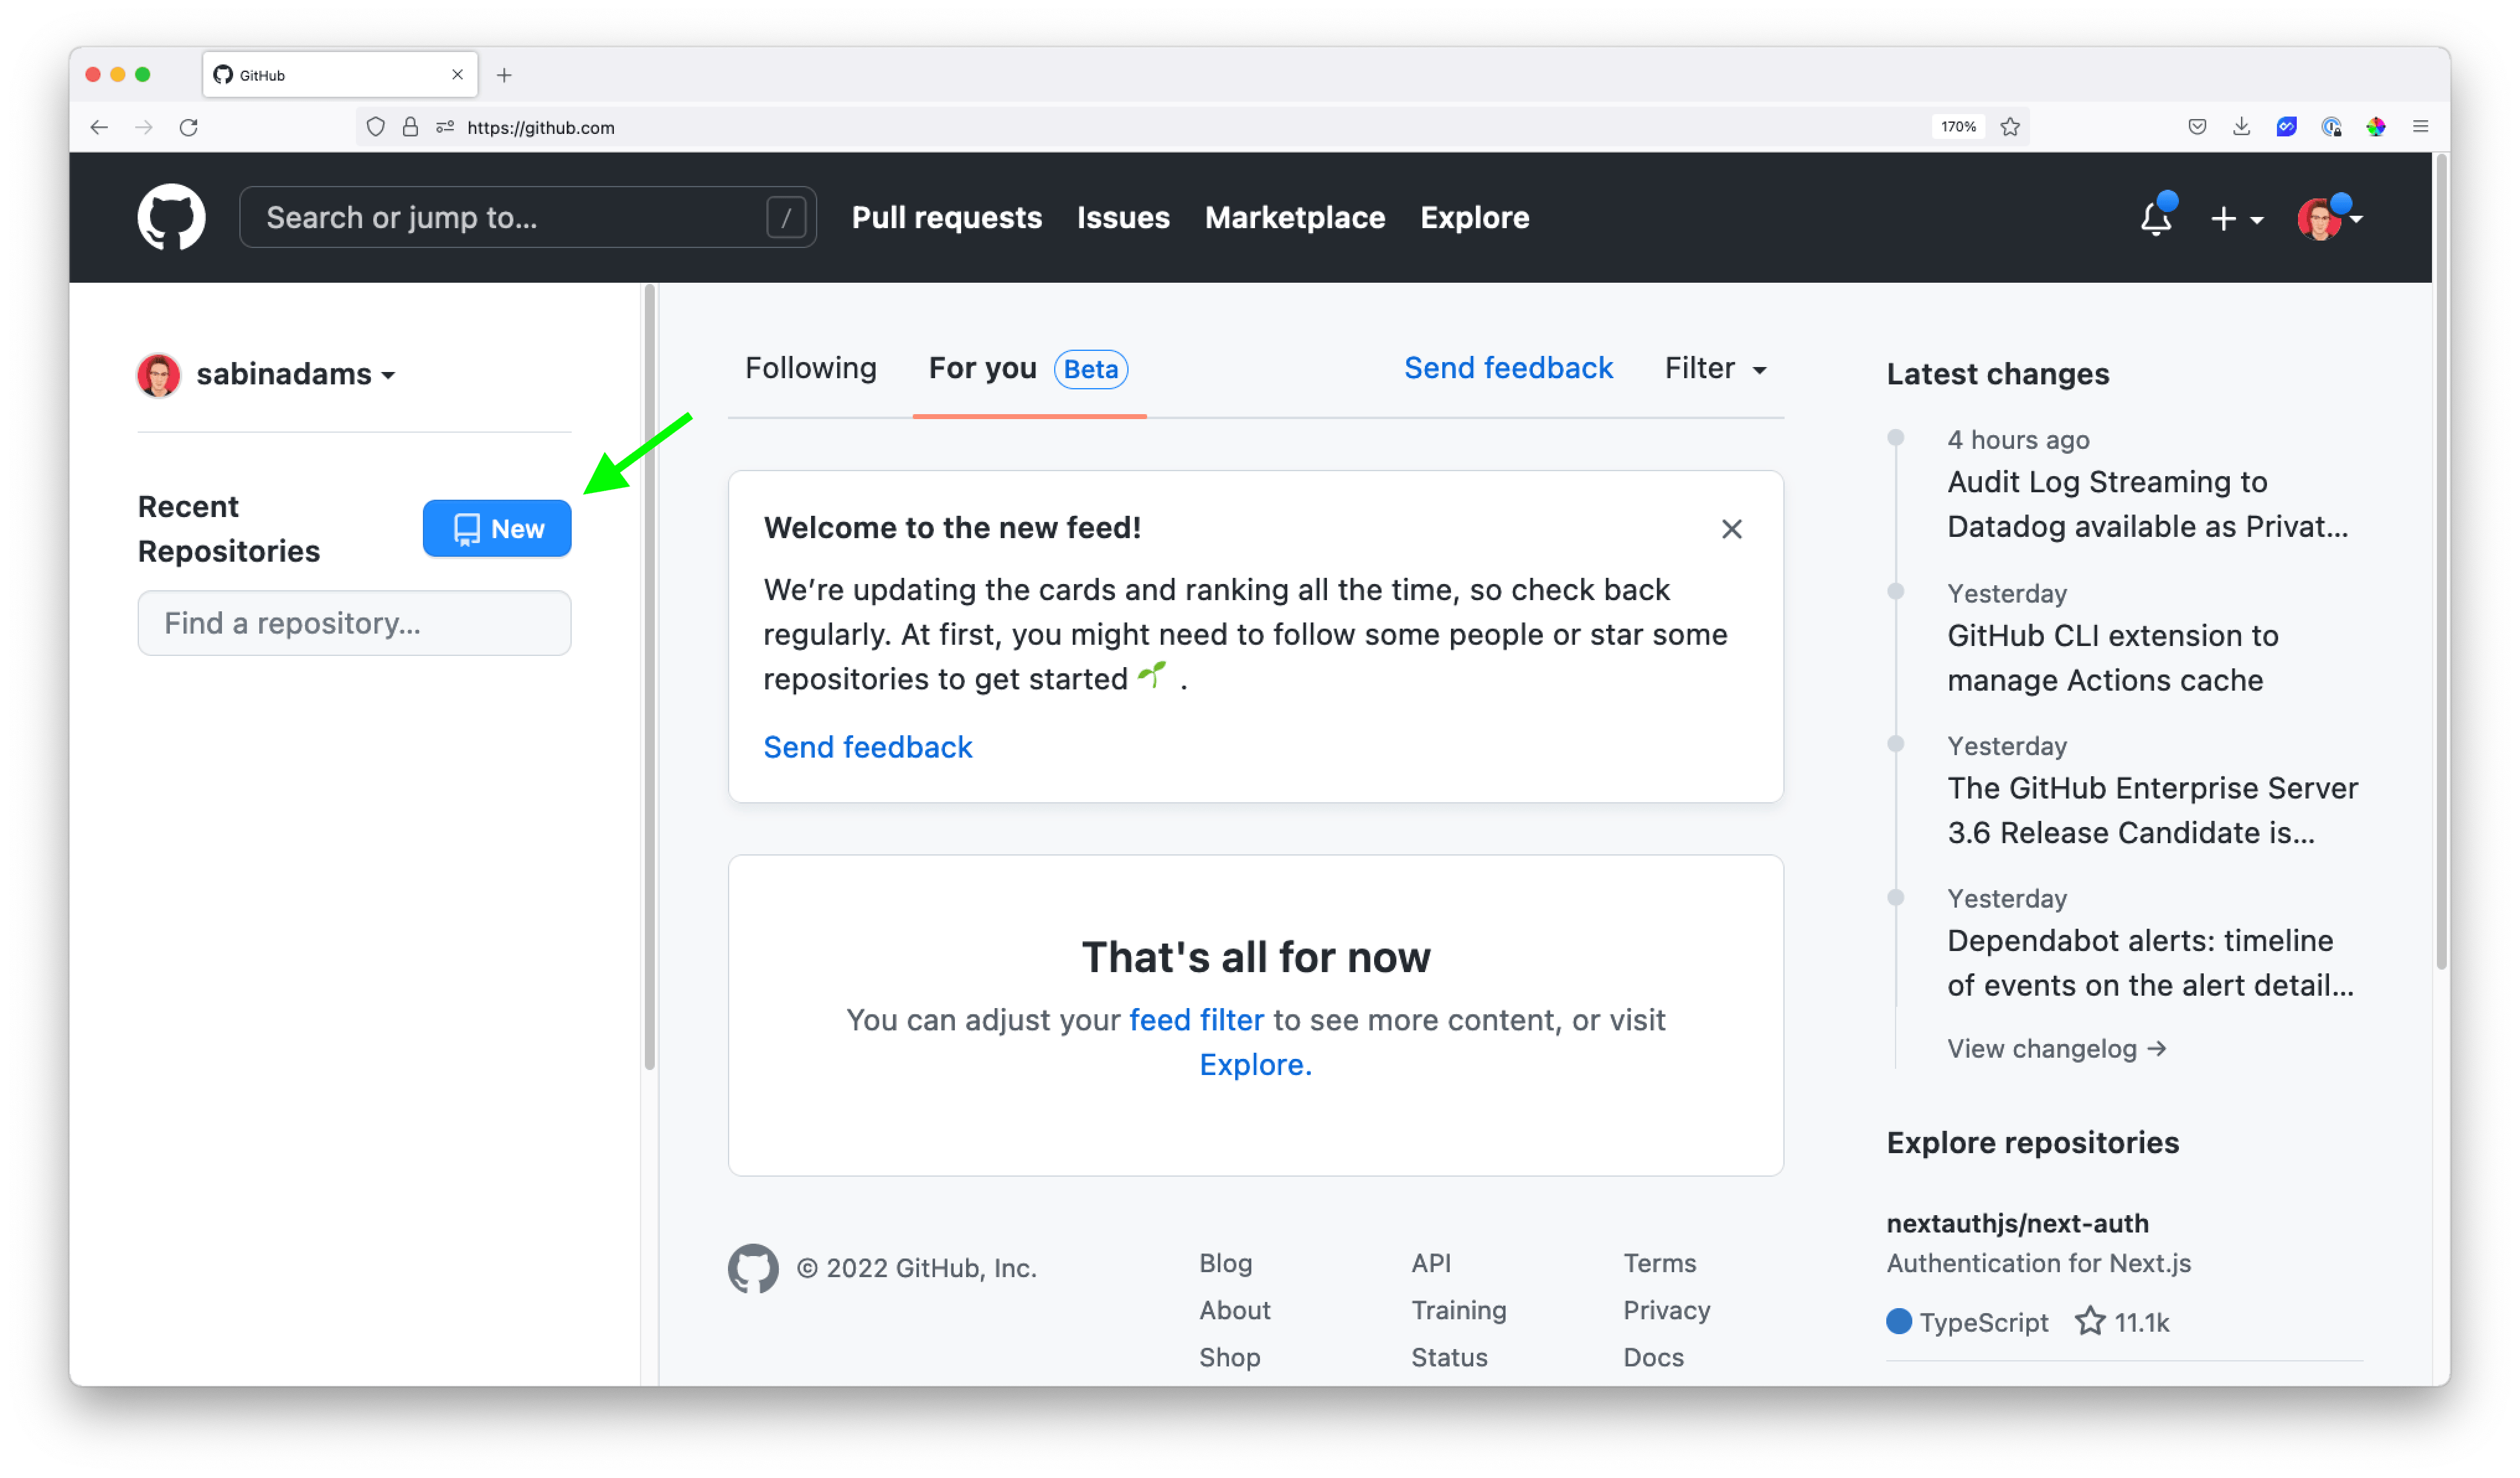
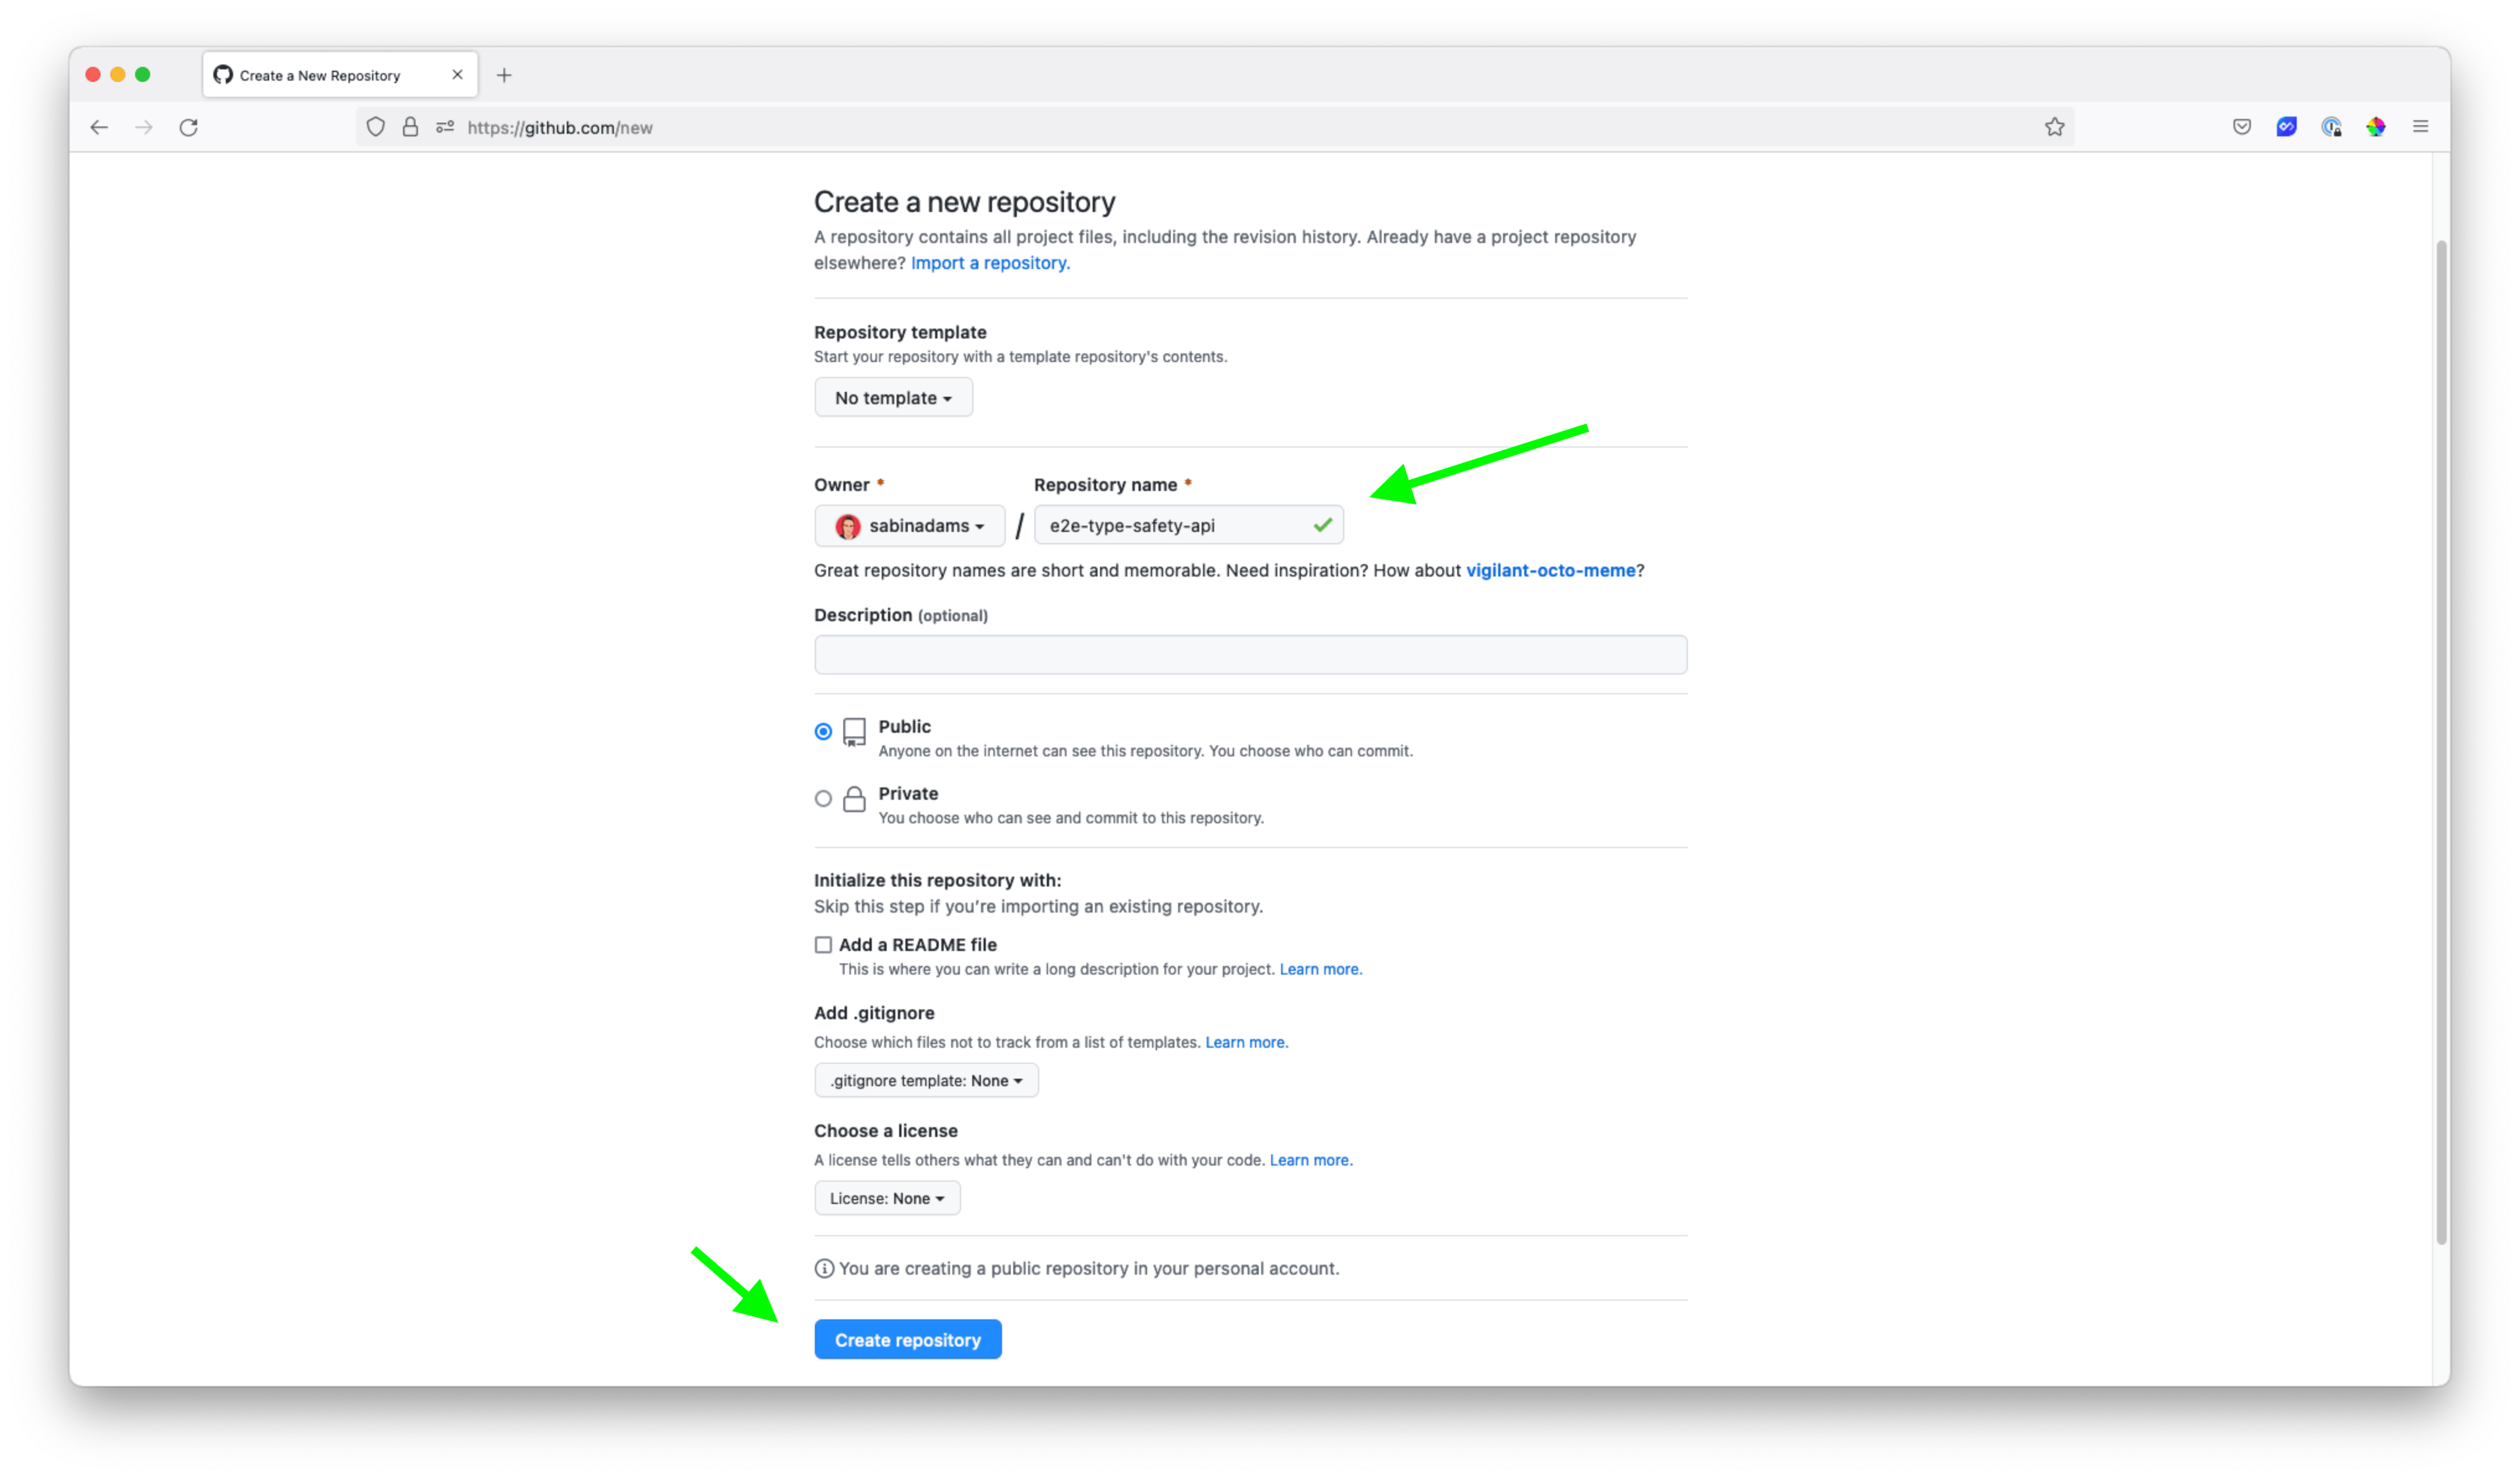
In the top left corner of the home page, hit the New button to create a new repository:
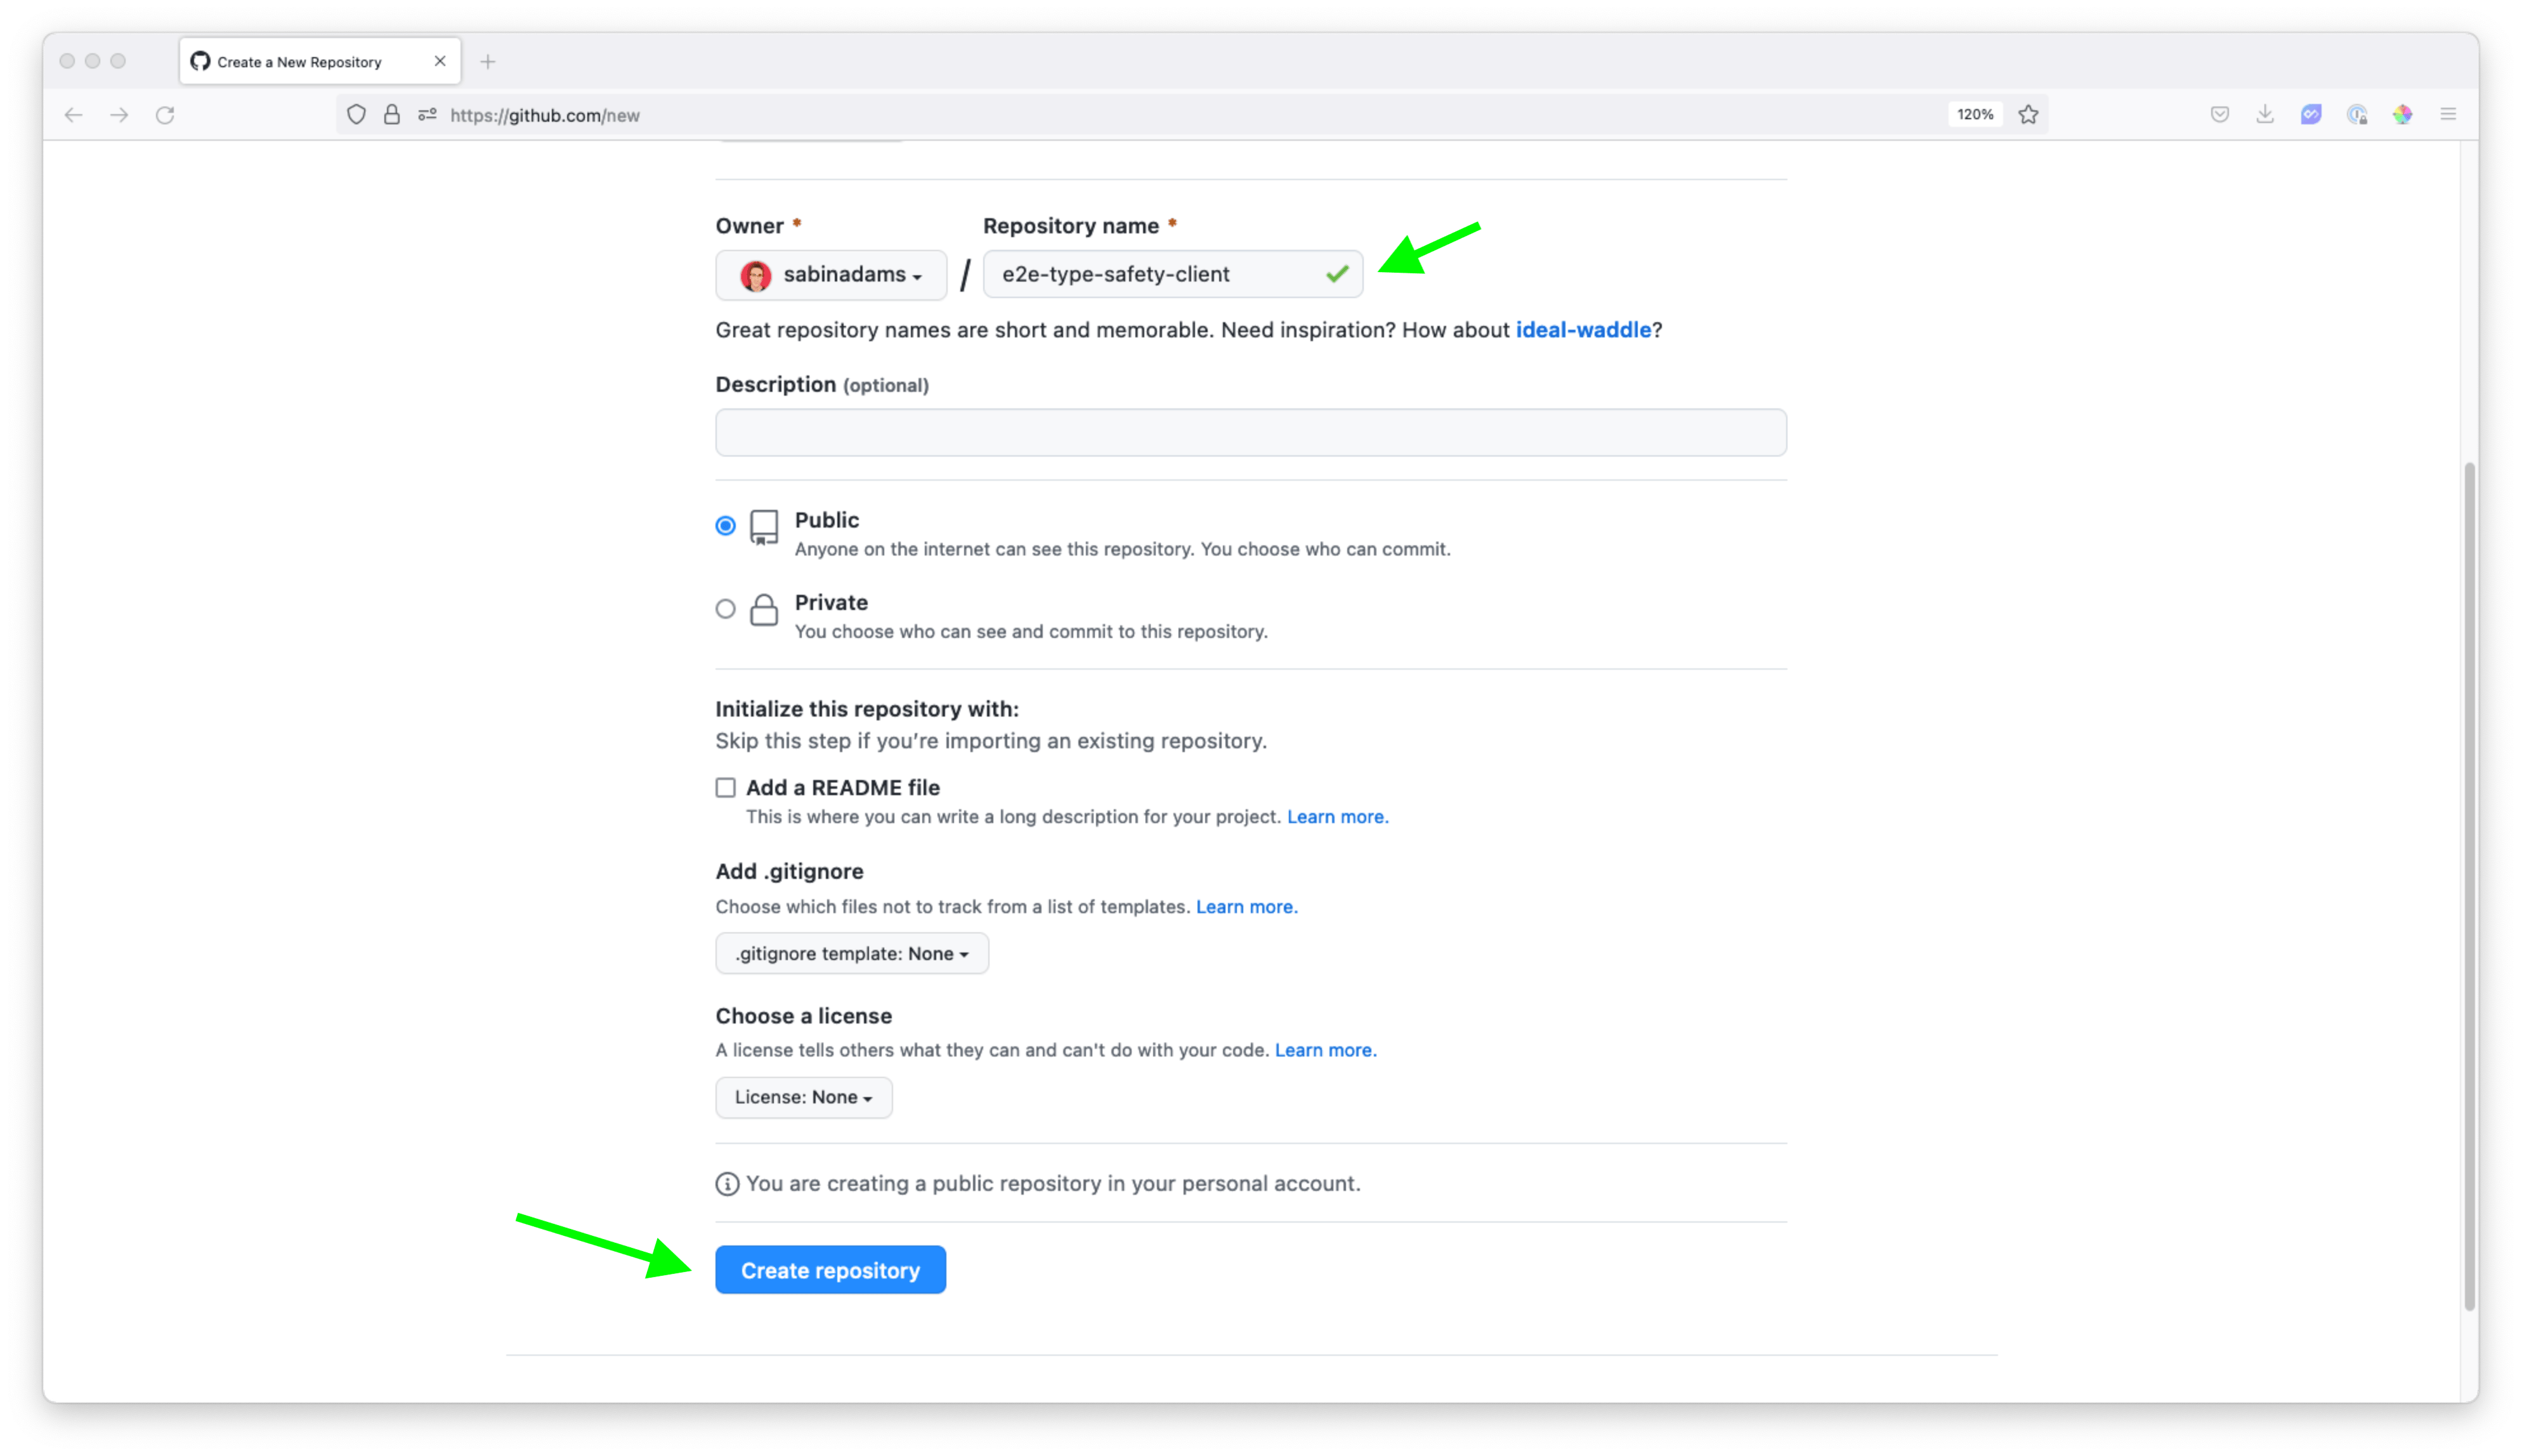
Give your repository a name and then hit Create repository:
You will need to retrieve the SSH url for this repository to use later on. Grab that from the location shown below:
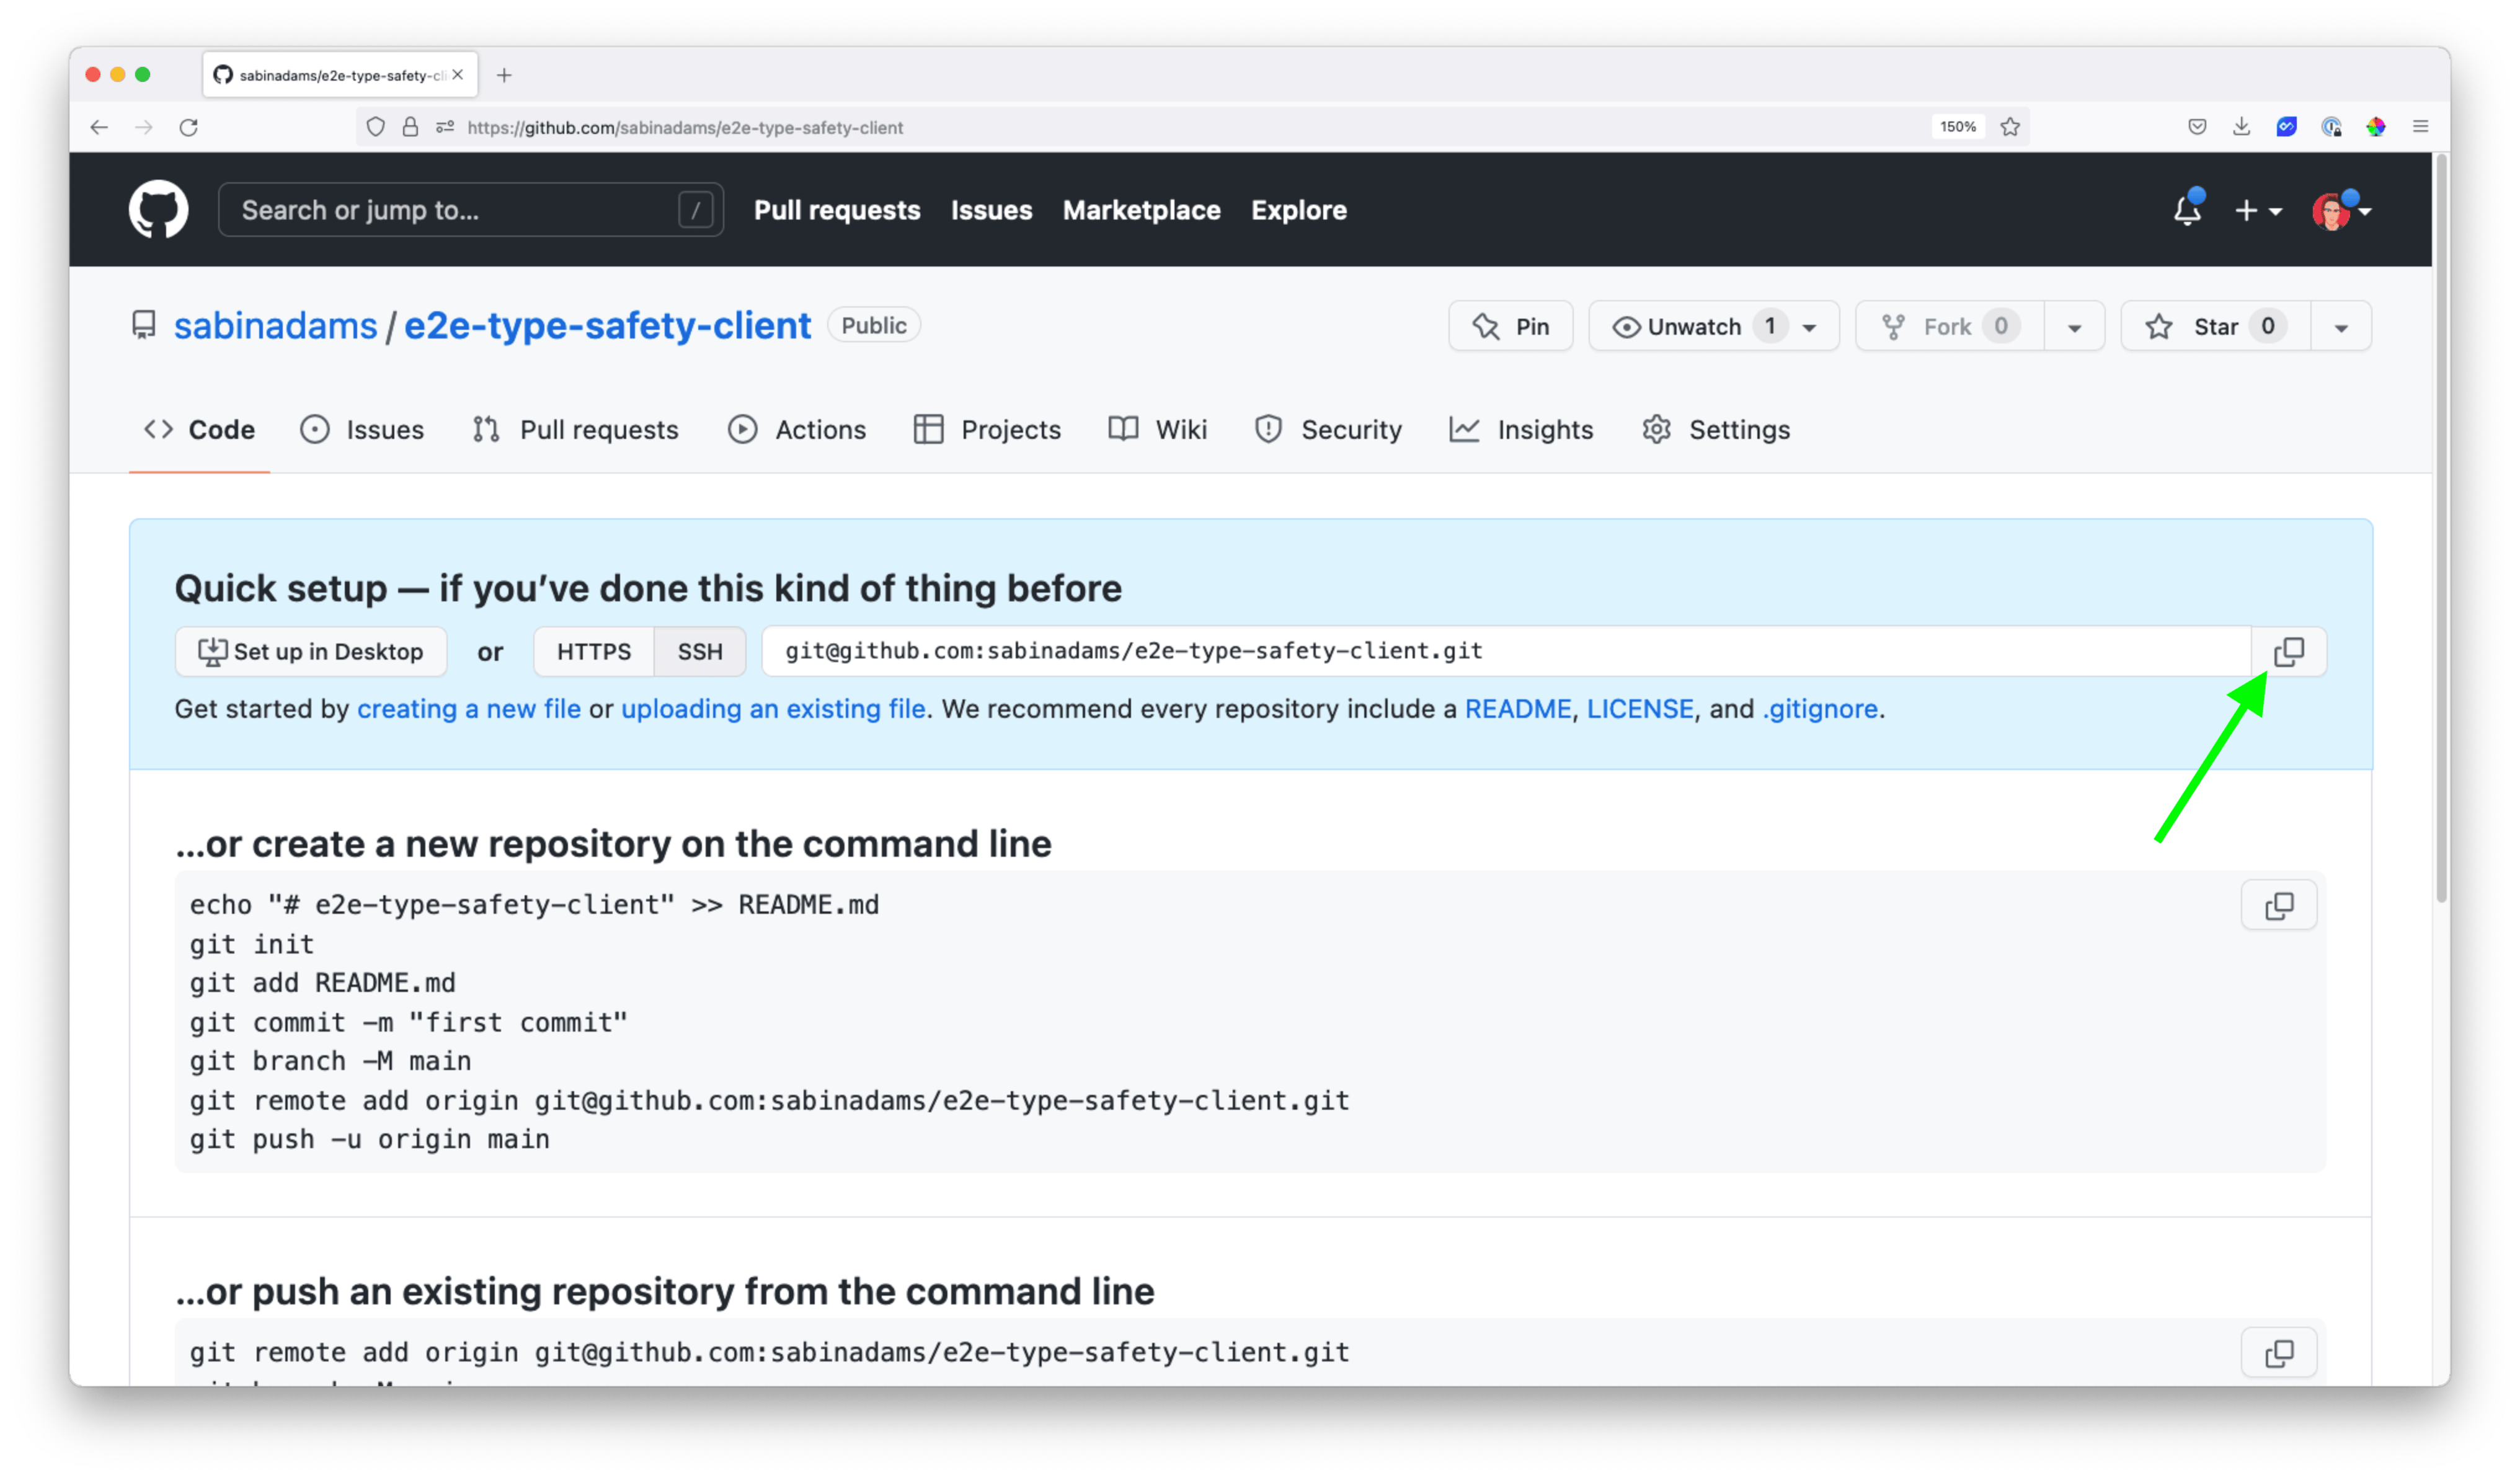
Now within your React application, run the follwing command to initialize and push a local repository, replacing <url> with the SSH url:
git init
git add .
git commit -m "first commit"
git branch -M main
git remote add origin <url>
git push -u origin main
git init
git add .
git commit -m "first commit"
git branch -M main
git remote add origin git@github.com:sabinadams/e2e-type-safety-client.git
git push -u origin mainNext, you will repeat these steps for your API's codebase. Create another new repository from your Github dashboard:
Title the repository and hit Create repository:
You should again see a page with some setup instructions. Grab the SSH url from the same location as before:

Finally, navigate via the terminal into your GraphQL API's codebase and run the following set of commands. Again, replace <url> with your SSH url:
git init
git add .
git commit -m "first commit"
git branch -M main
git remote add origin <url>
git push -u origin main
git init
git add .
git commit -m "first commit"
git branch -M main
git remote add origin git@github.com:sabinadams/e2e-type-safety-api.git
git push -u origin mainDeploy the API
Now that your code is available on Github, you can deploy your codebases!
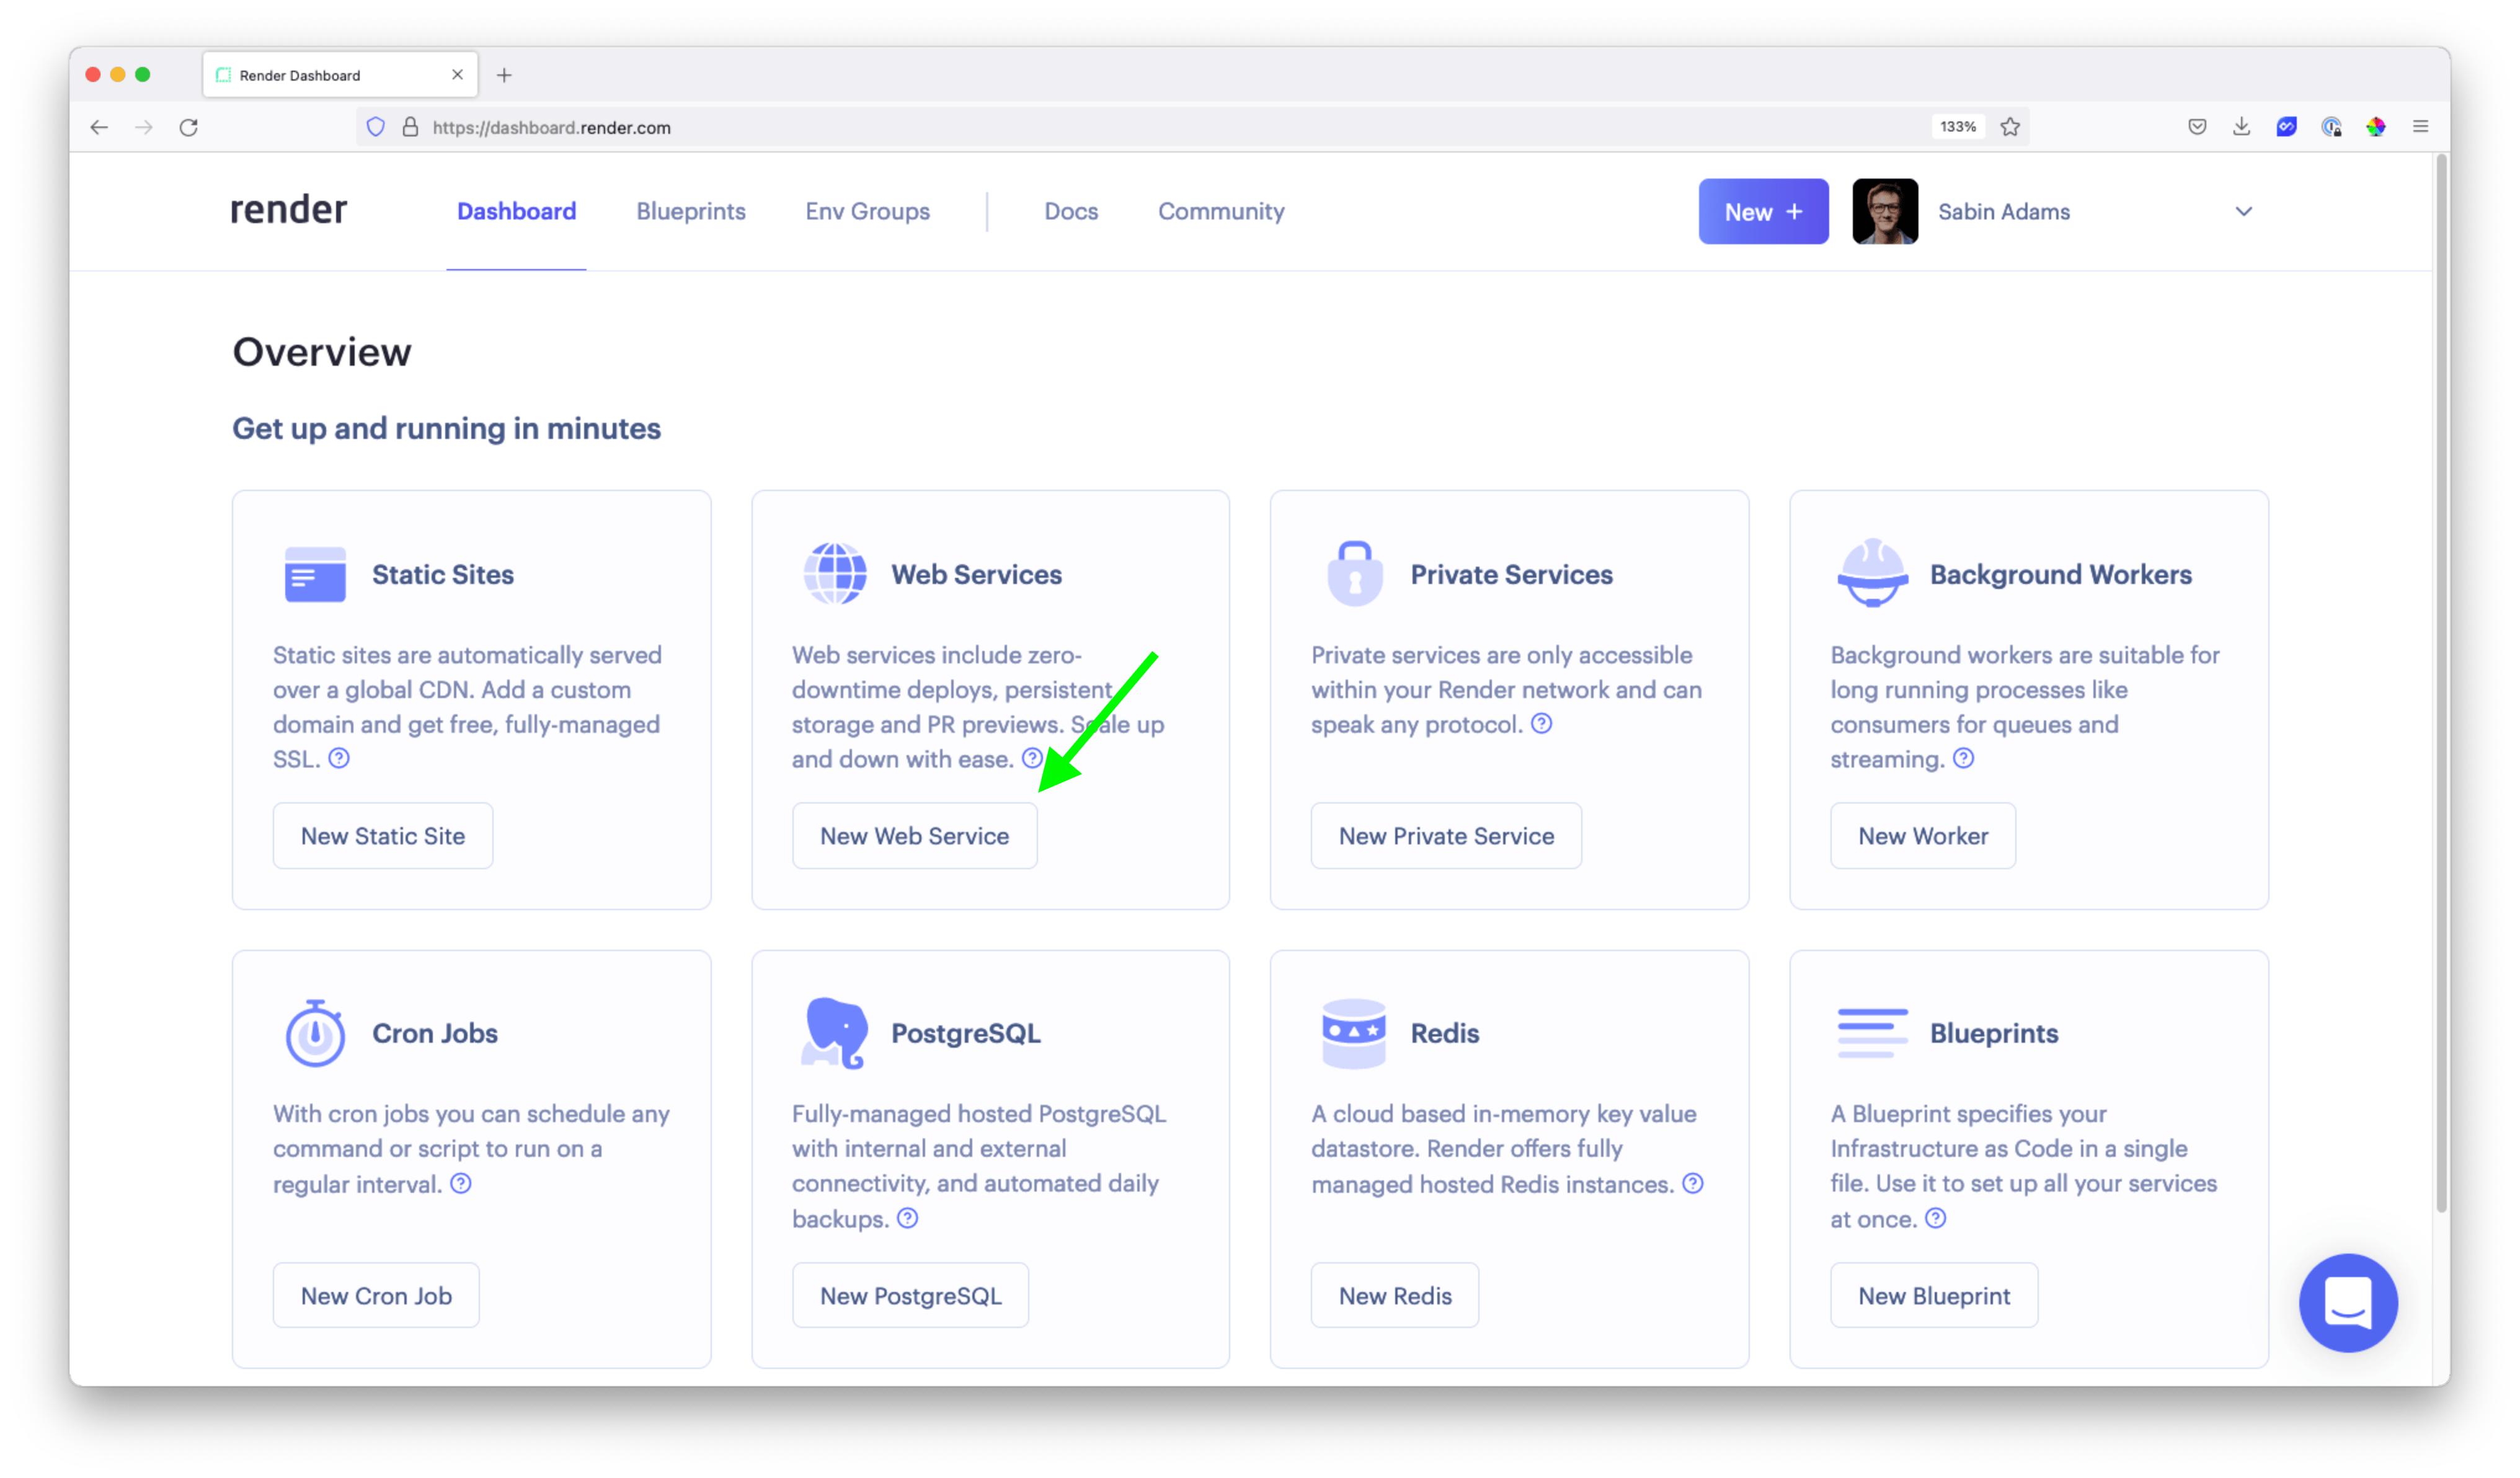
Head over to Render and create a free account if you do not already have one.
The first thing you will deploy is your GraphQL API. On your dashboard, hit the New Web Service button, which will allow you to deploy a Node.js application:
On this page, if you haven't already, click + Connect account under the Github header to give Render access to list your Github repositories:
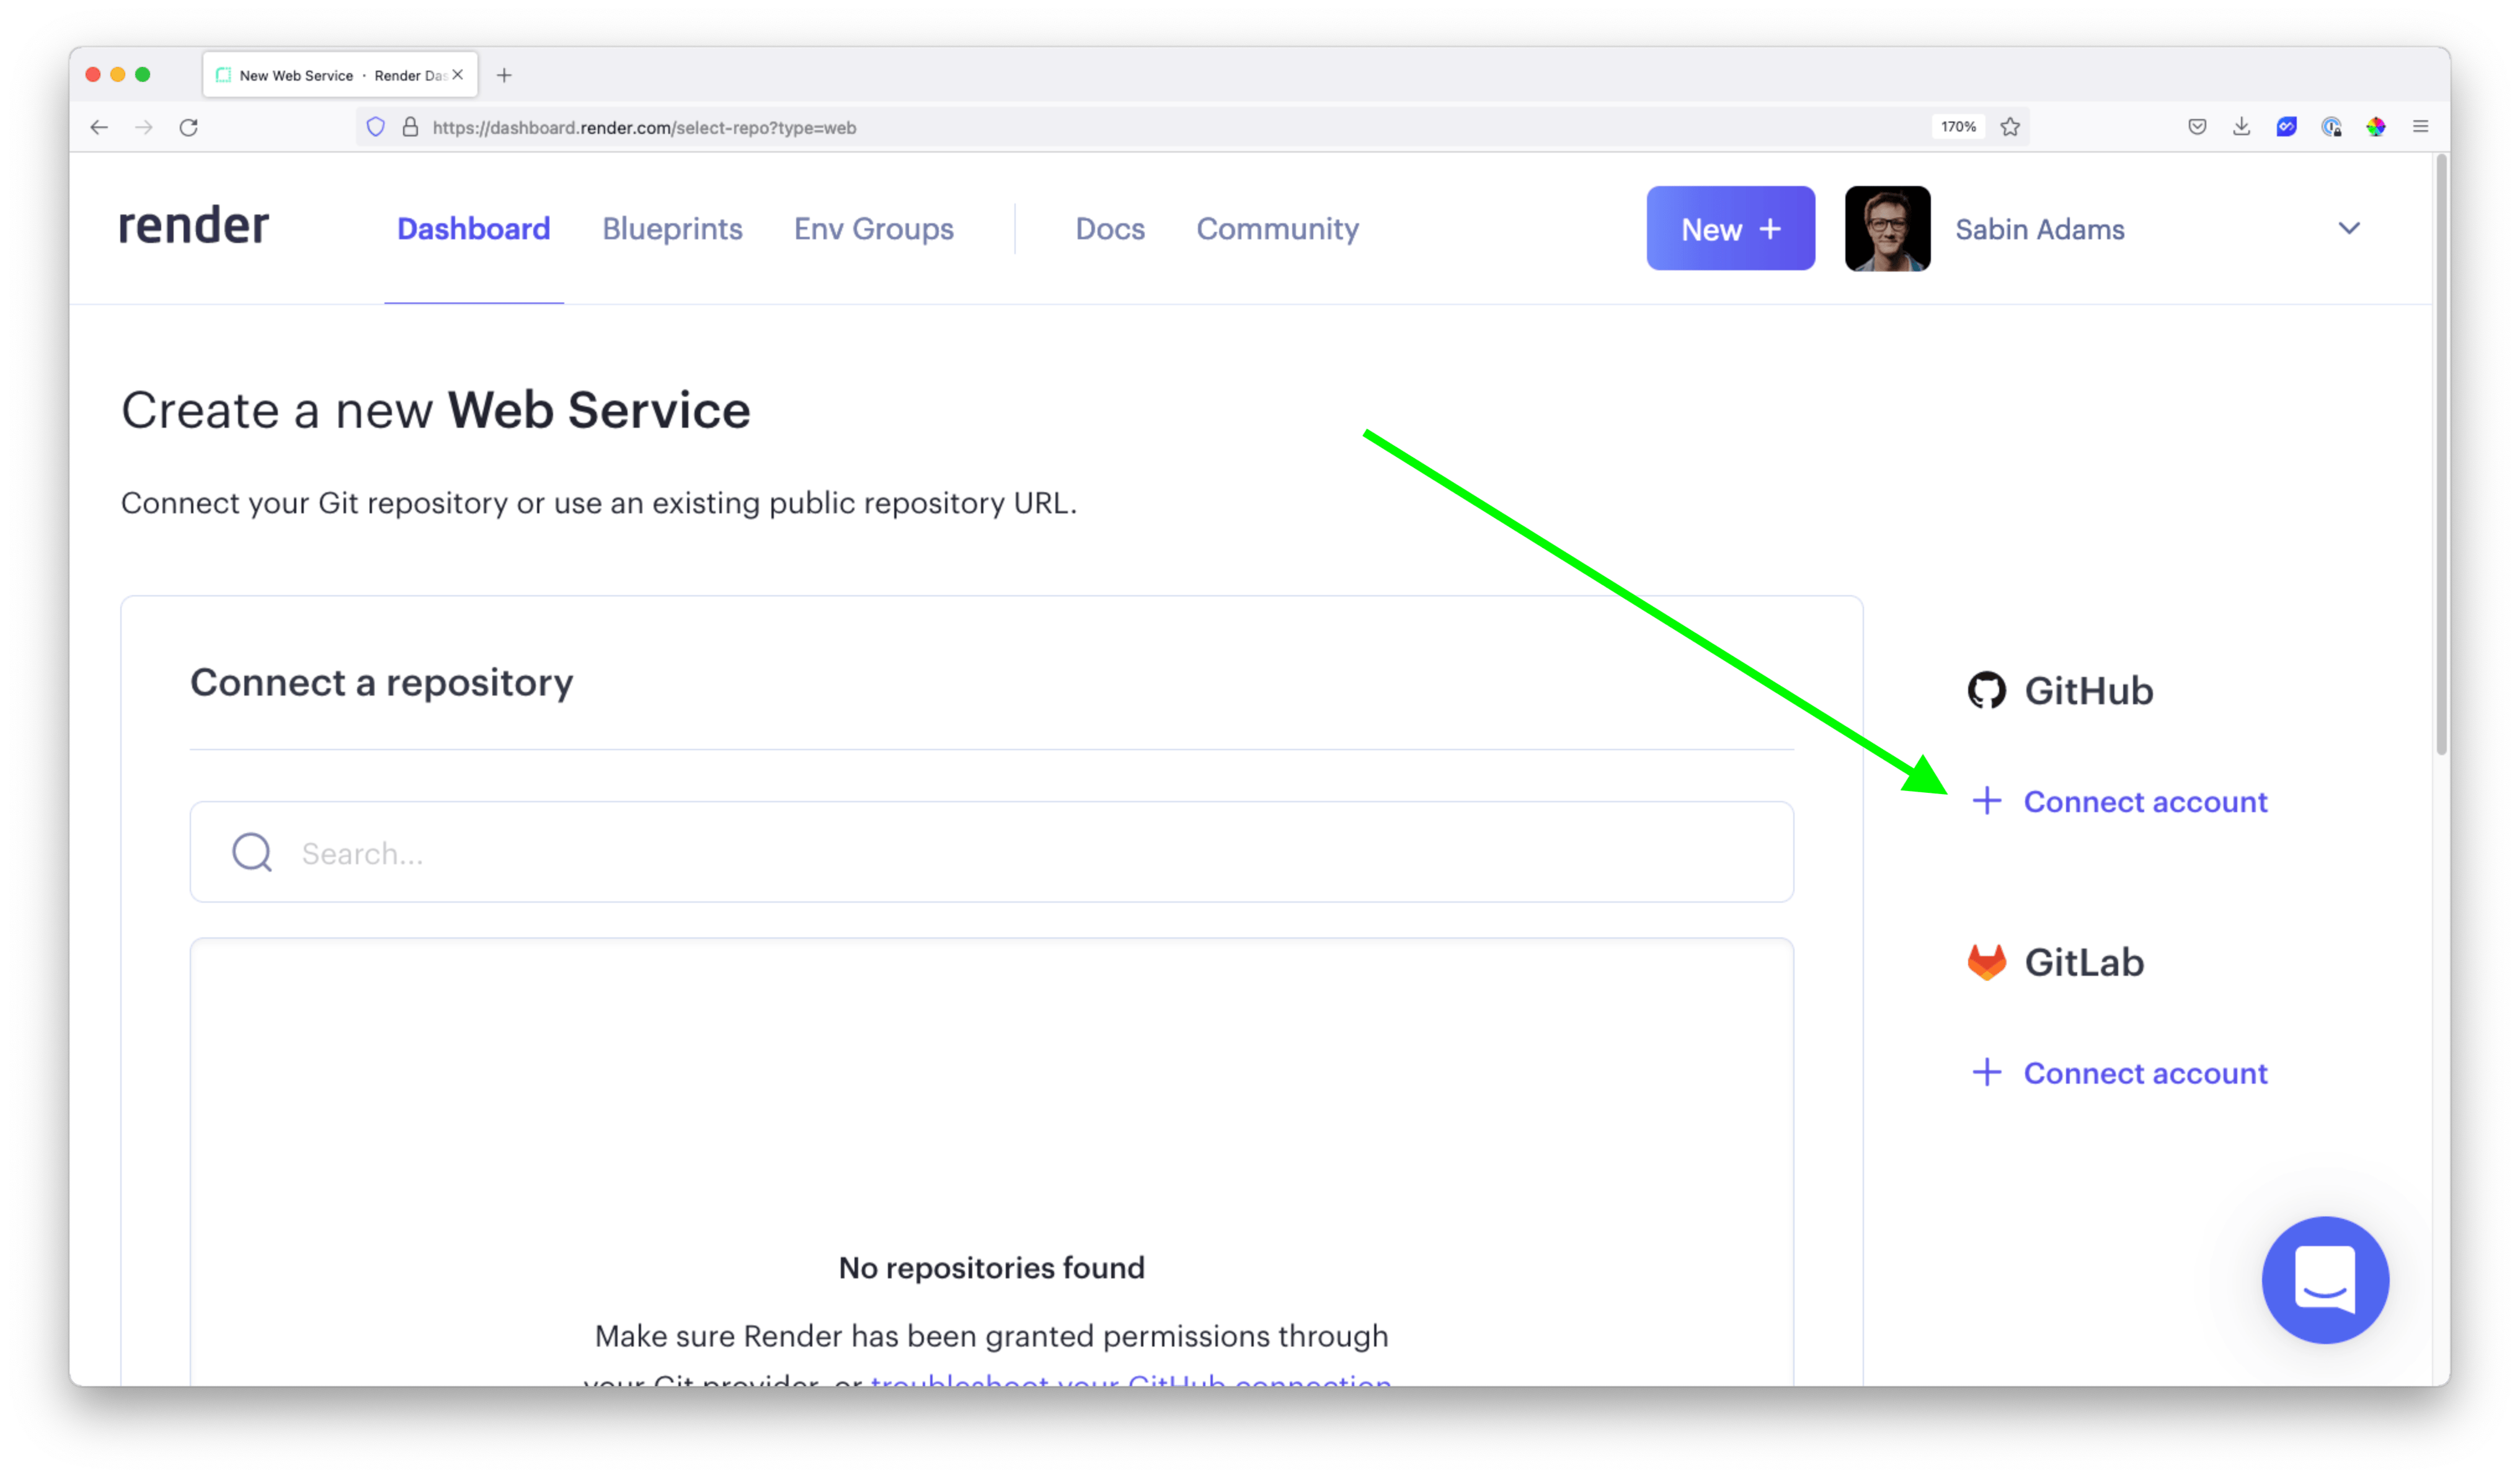
After connecting your account, you should see your repositories available under the Connect a repository header. Choose your GraphQL API repository.
You will be prompted for a few different options:
- name: Pick any name you'd like
- Environment:
Node - Region: Stick with the default
- Branch:
main - Build Command:
npm run build - Start Command:
npm run dev
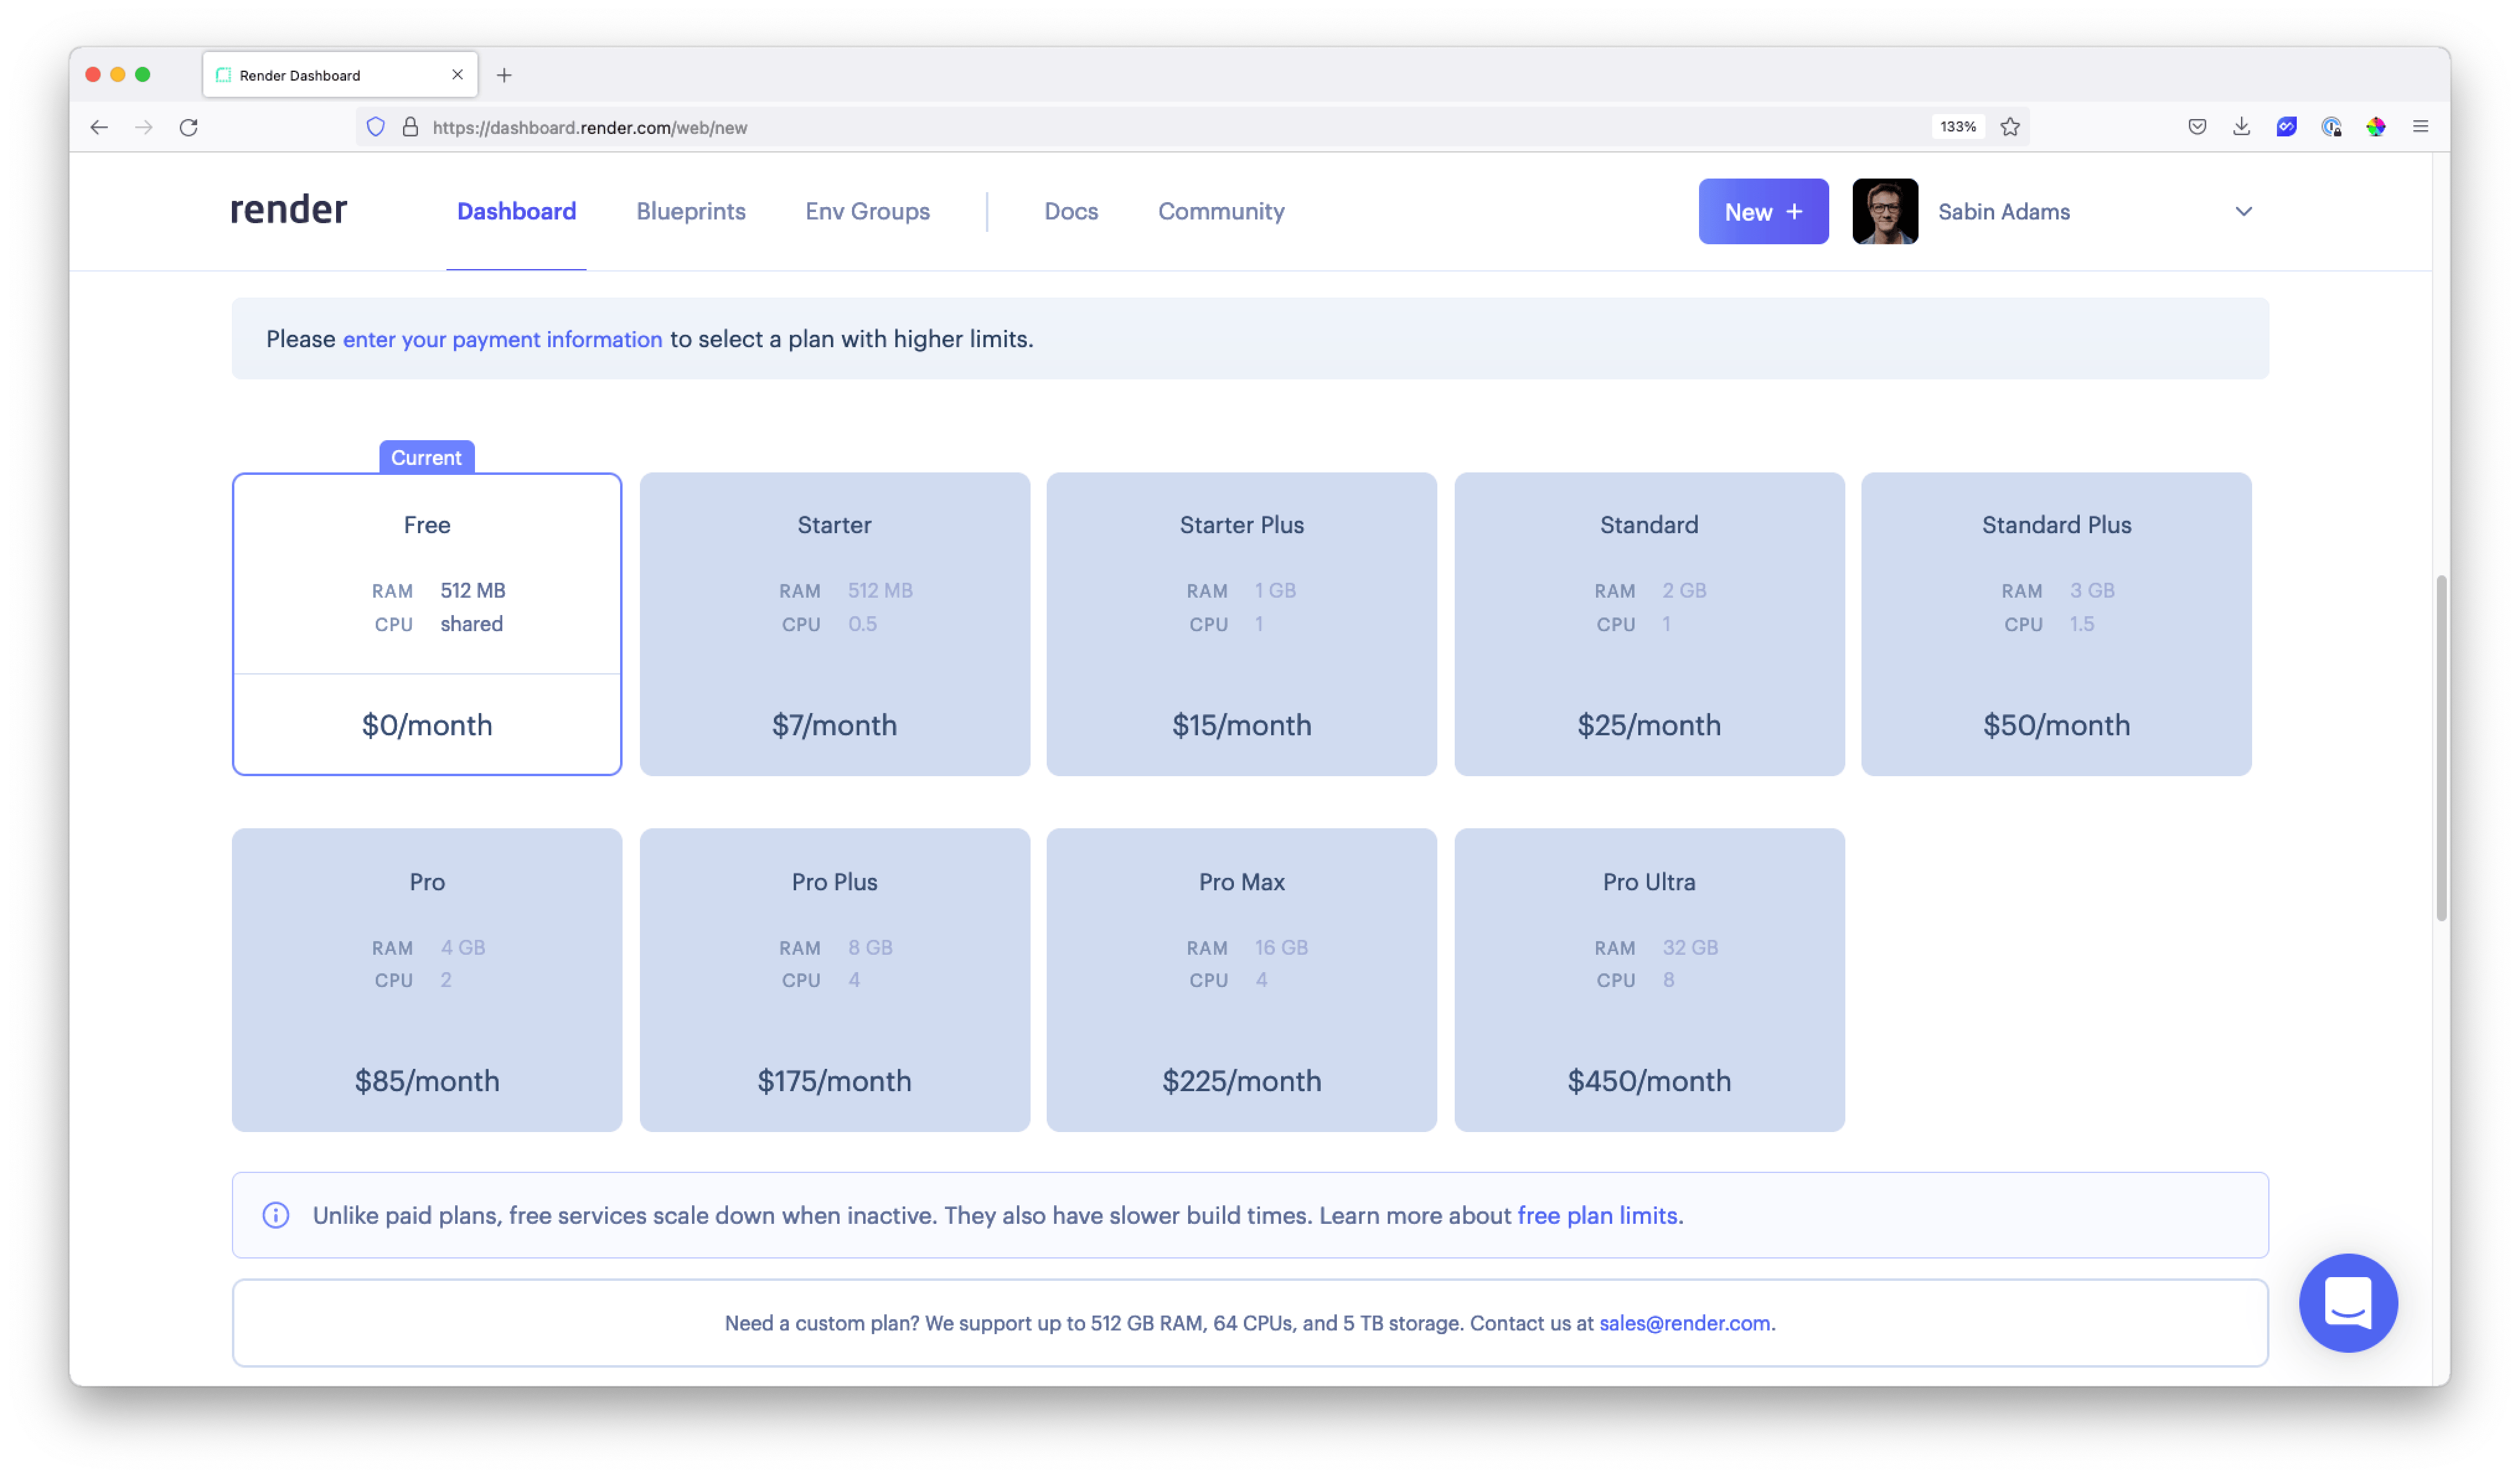
Beneath those options, choose the Free plan:
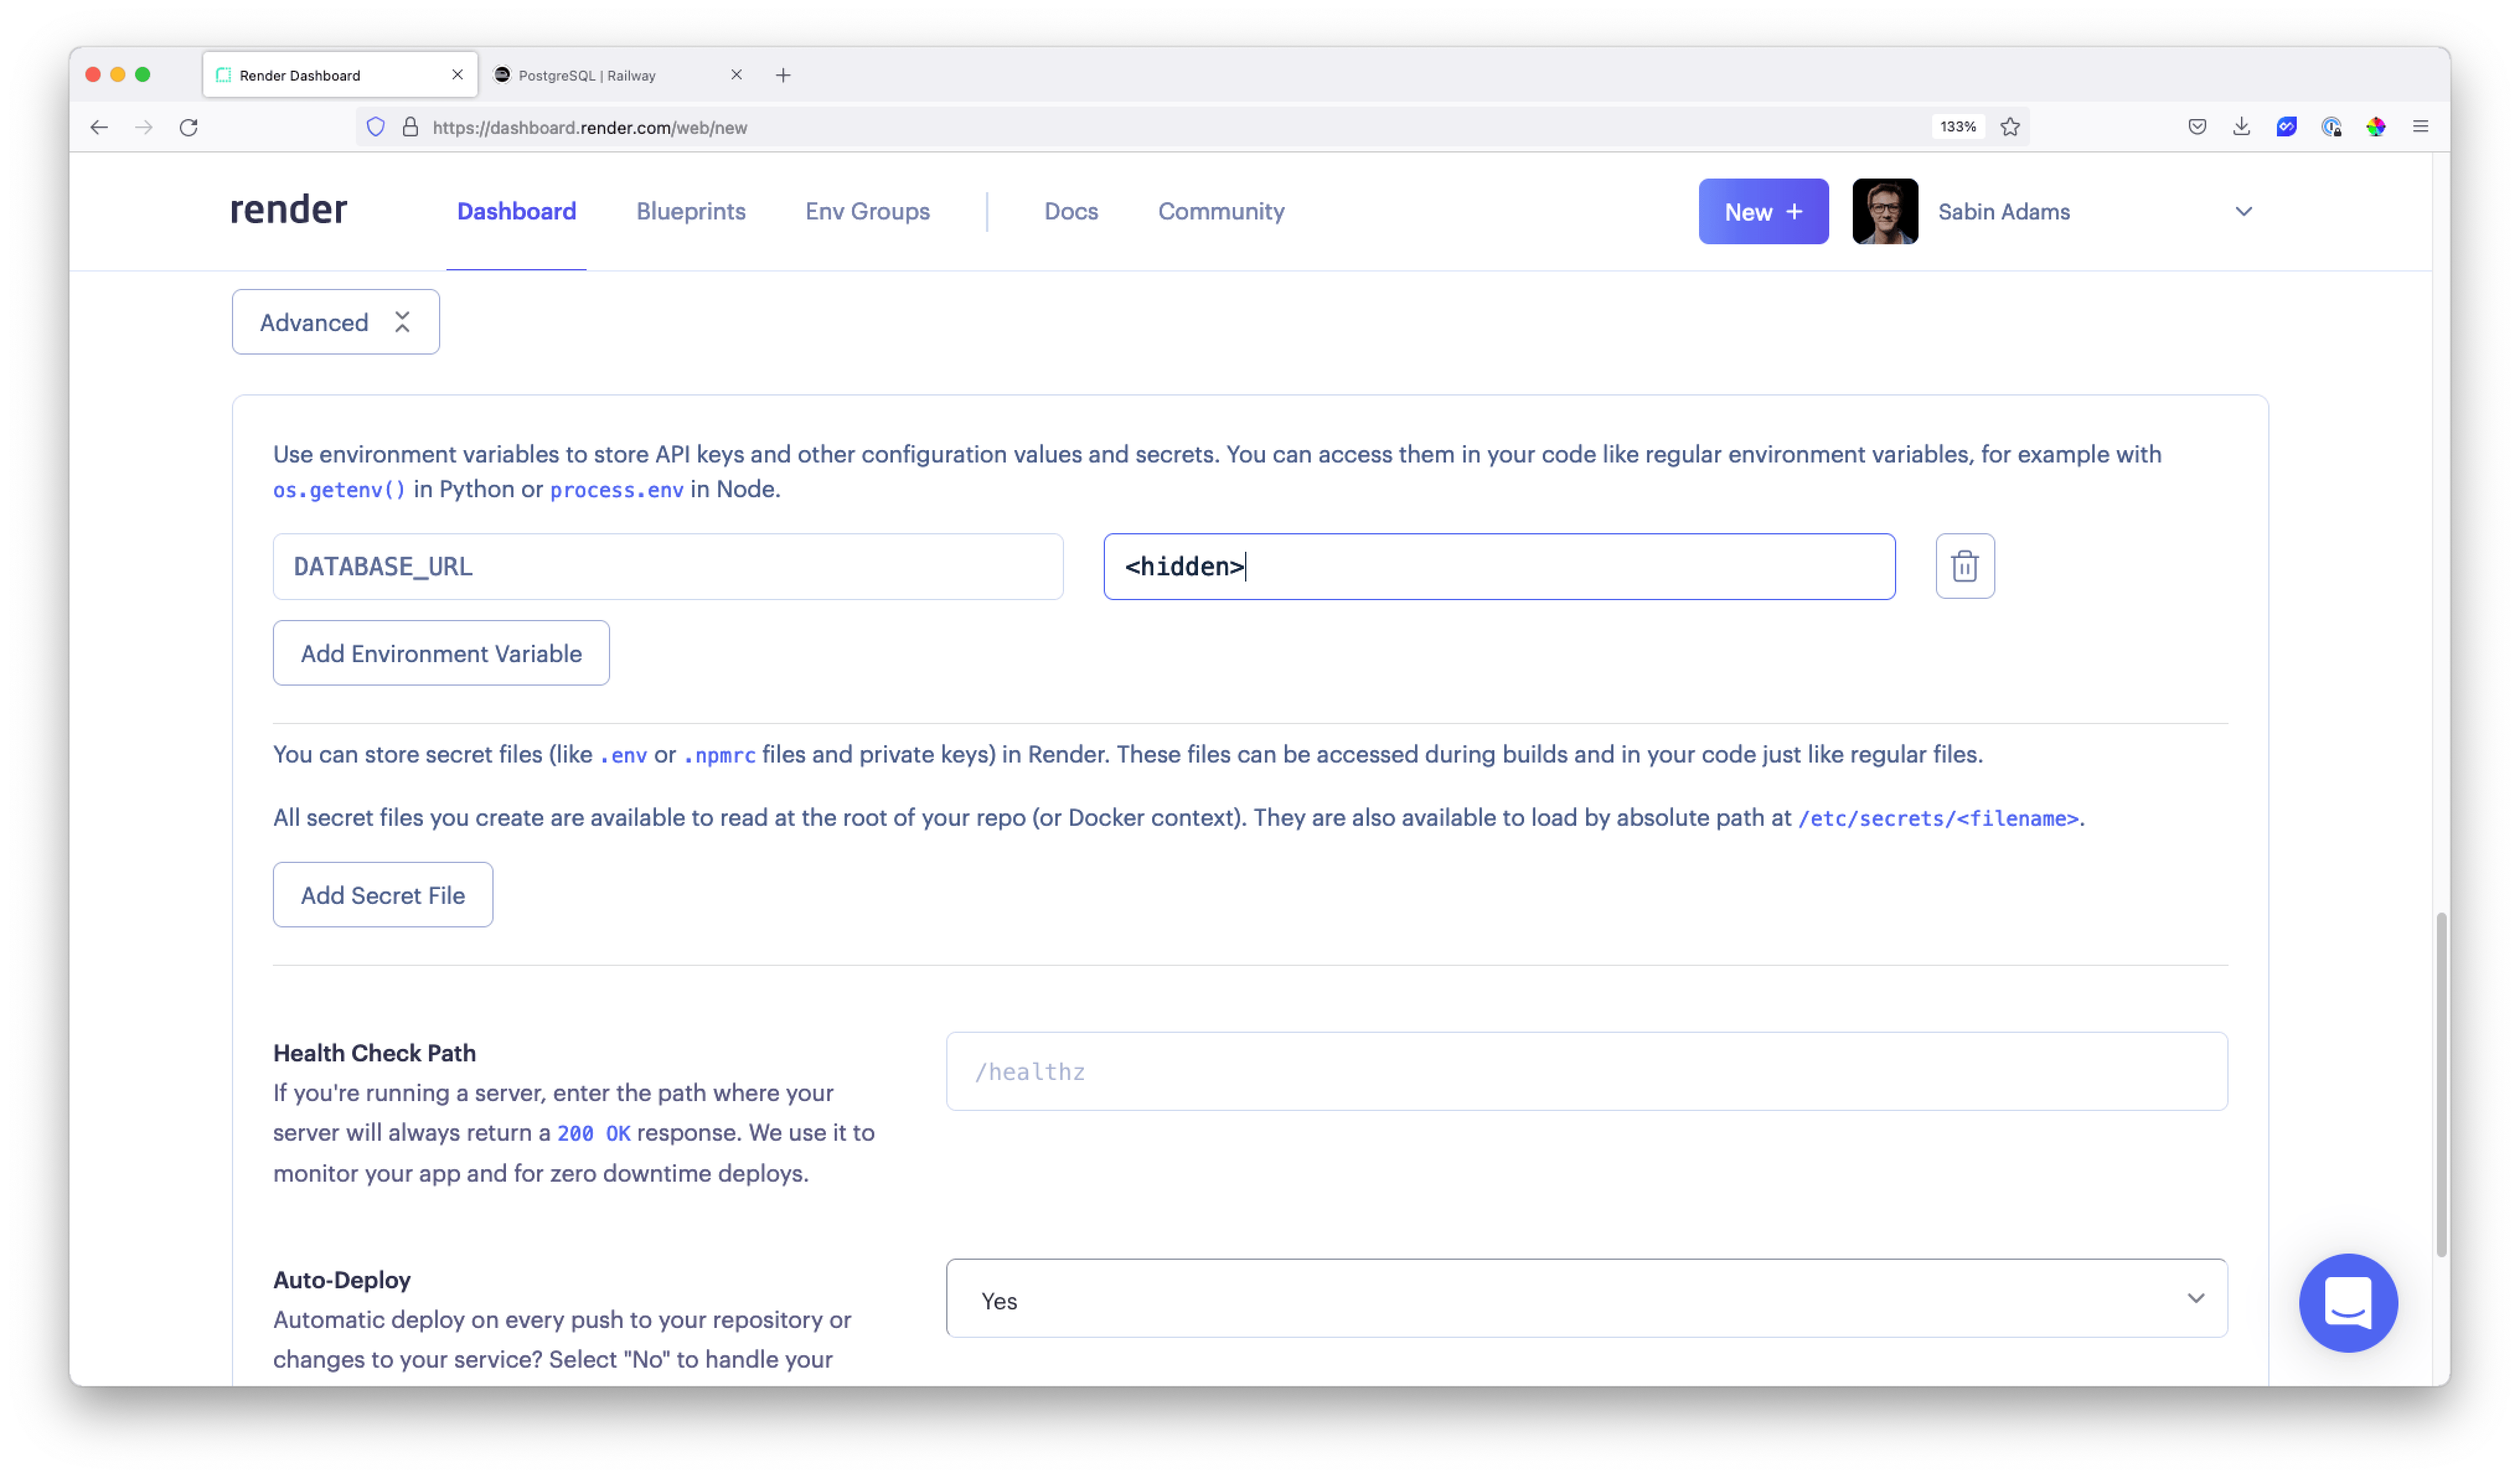
Expand the Advanced section near the bottom of the page. Here you will define an environment variable that will hold your database URL.
Click the Add Environment Variable button and add a variable named DATABASE_URL whose value is the connection string to your Postgres database:
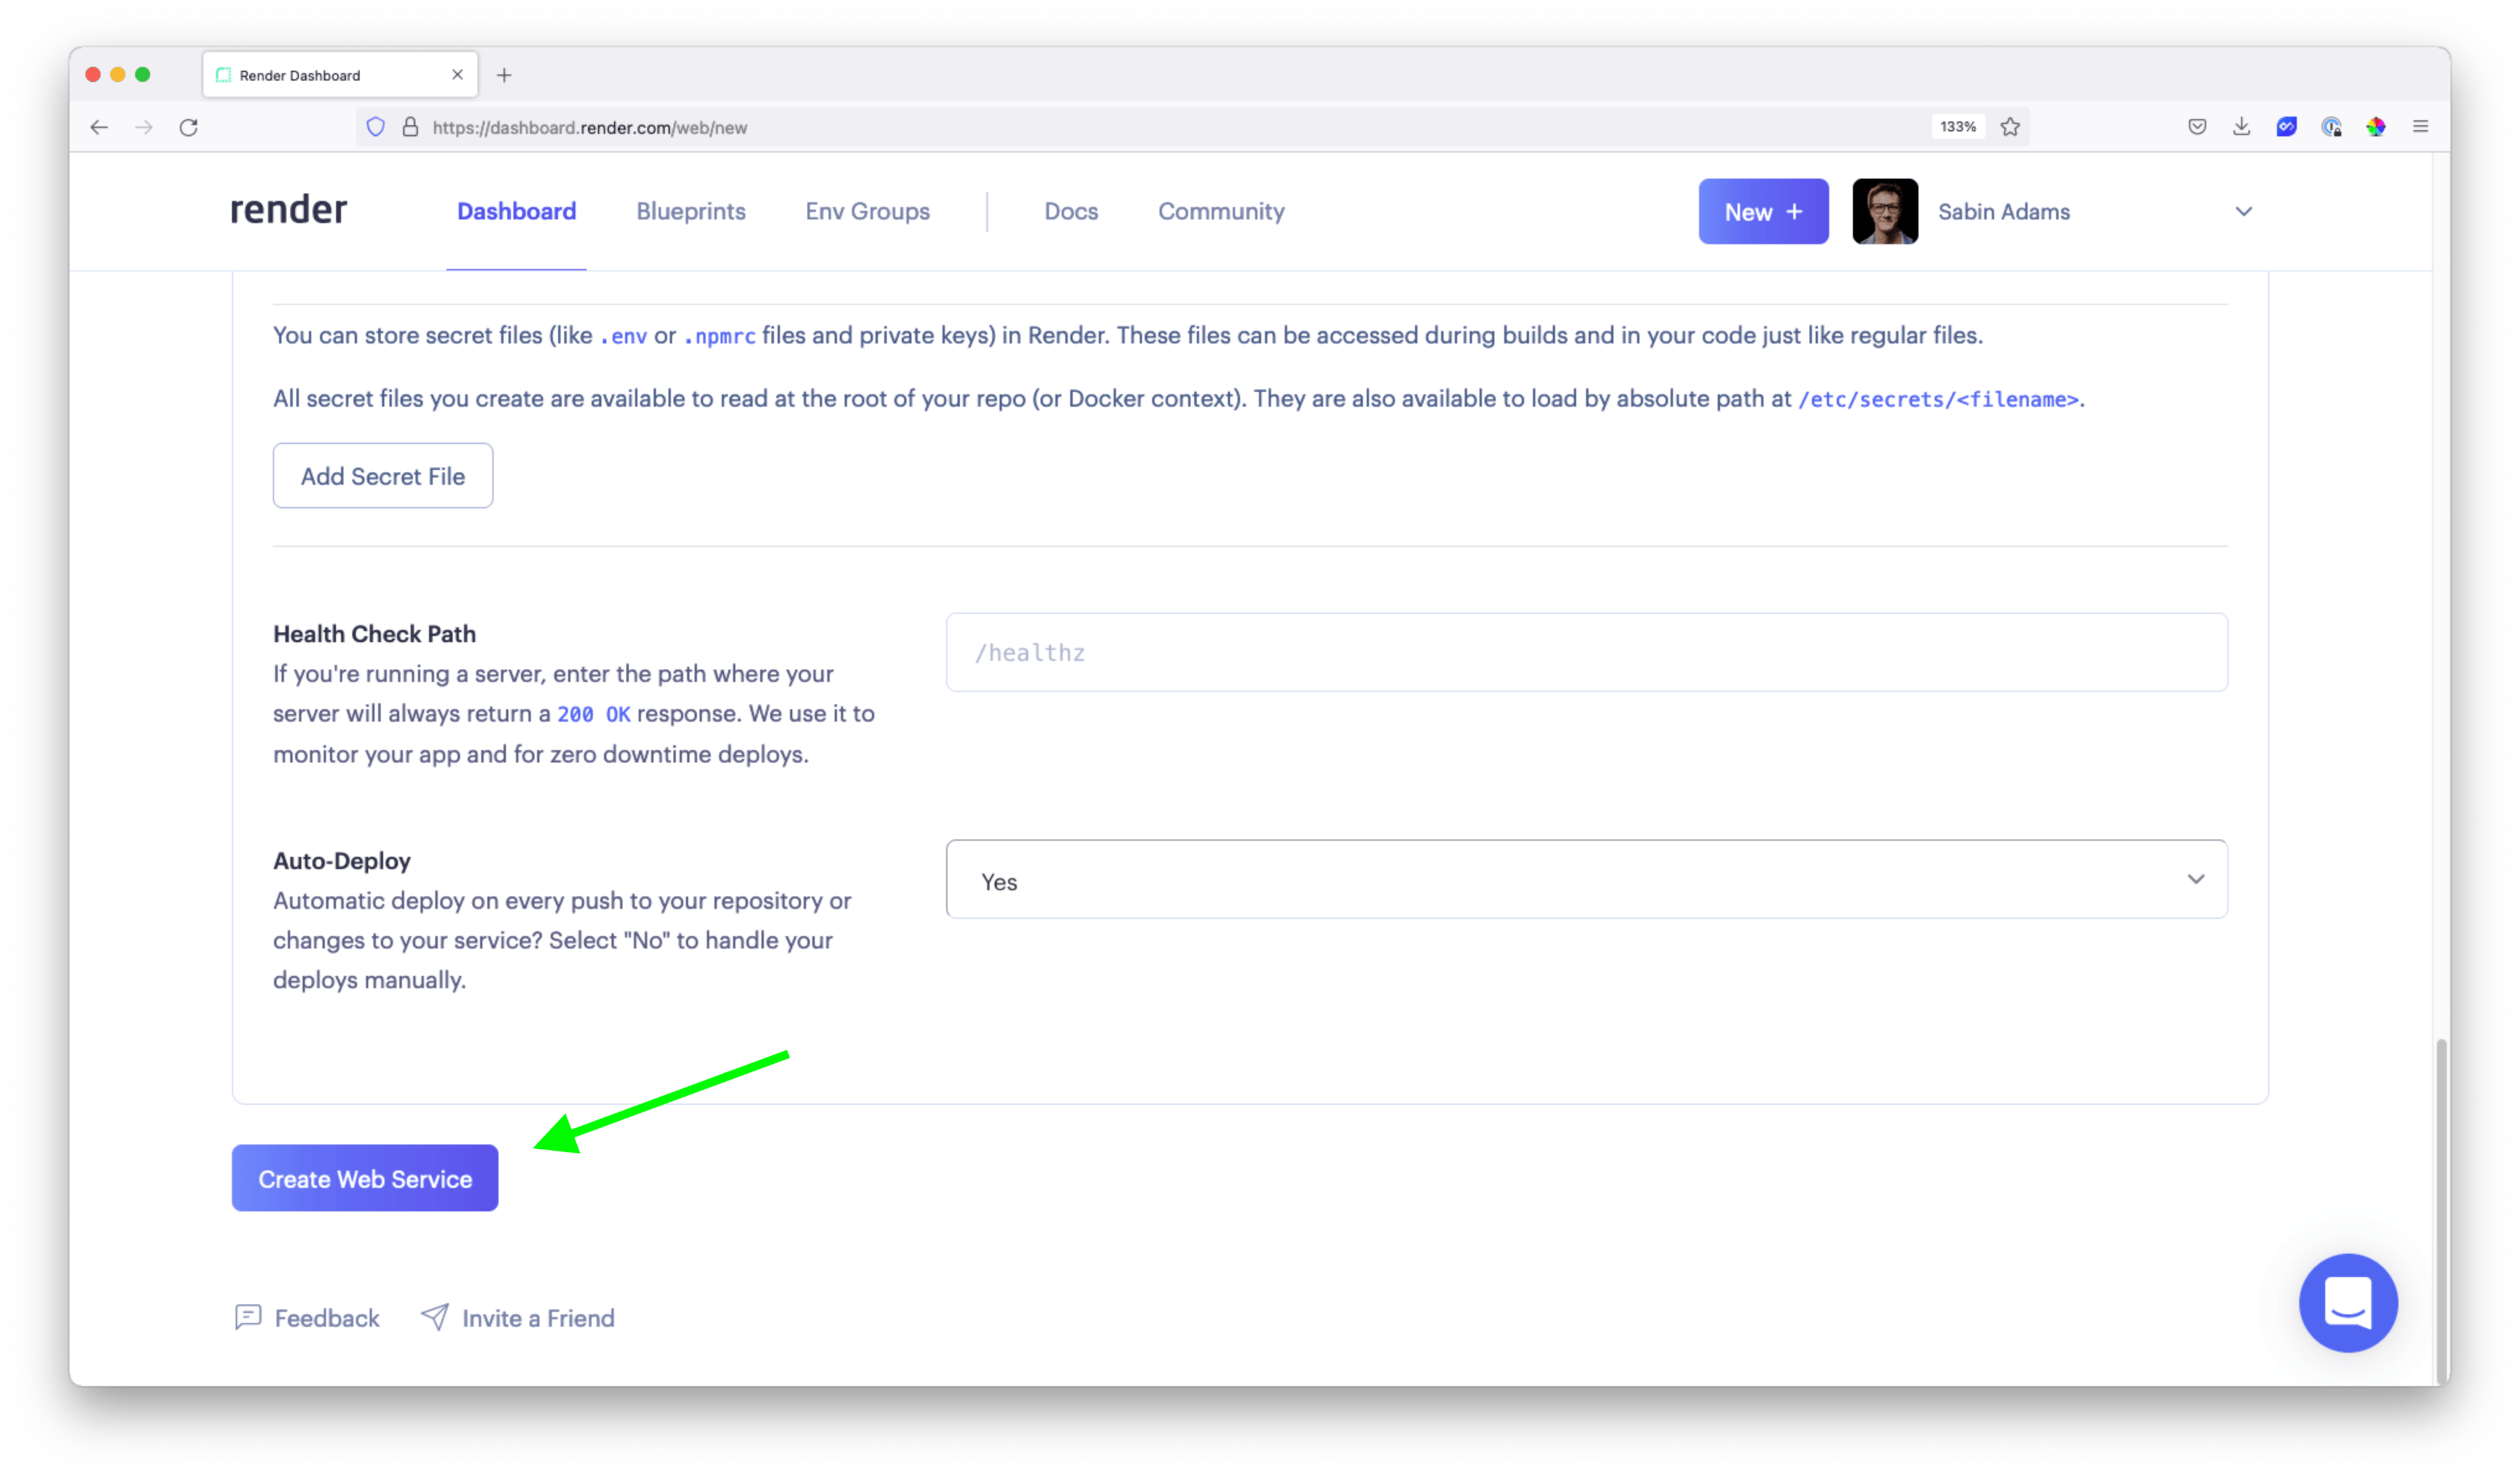
Finally, at the bottom of the page, hit the Create Web Service button:
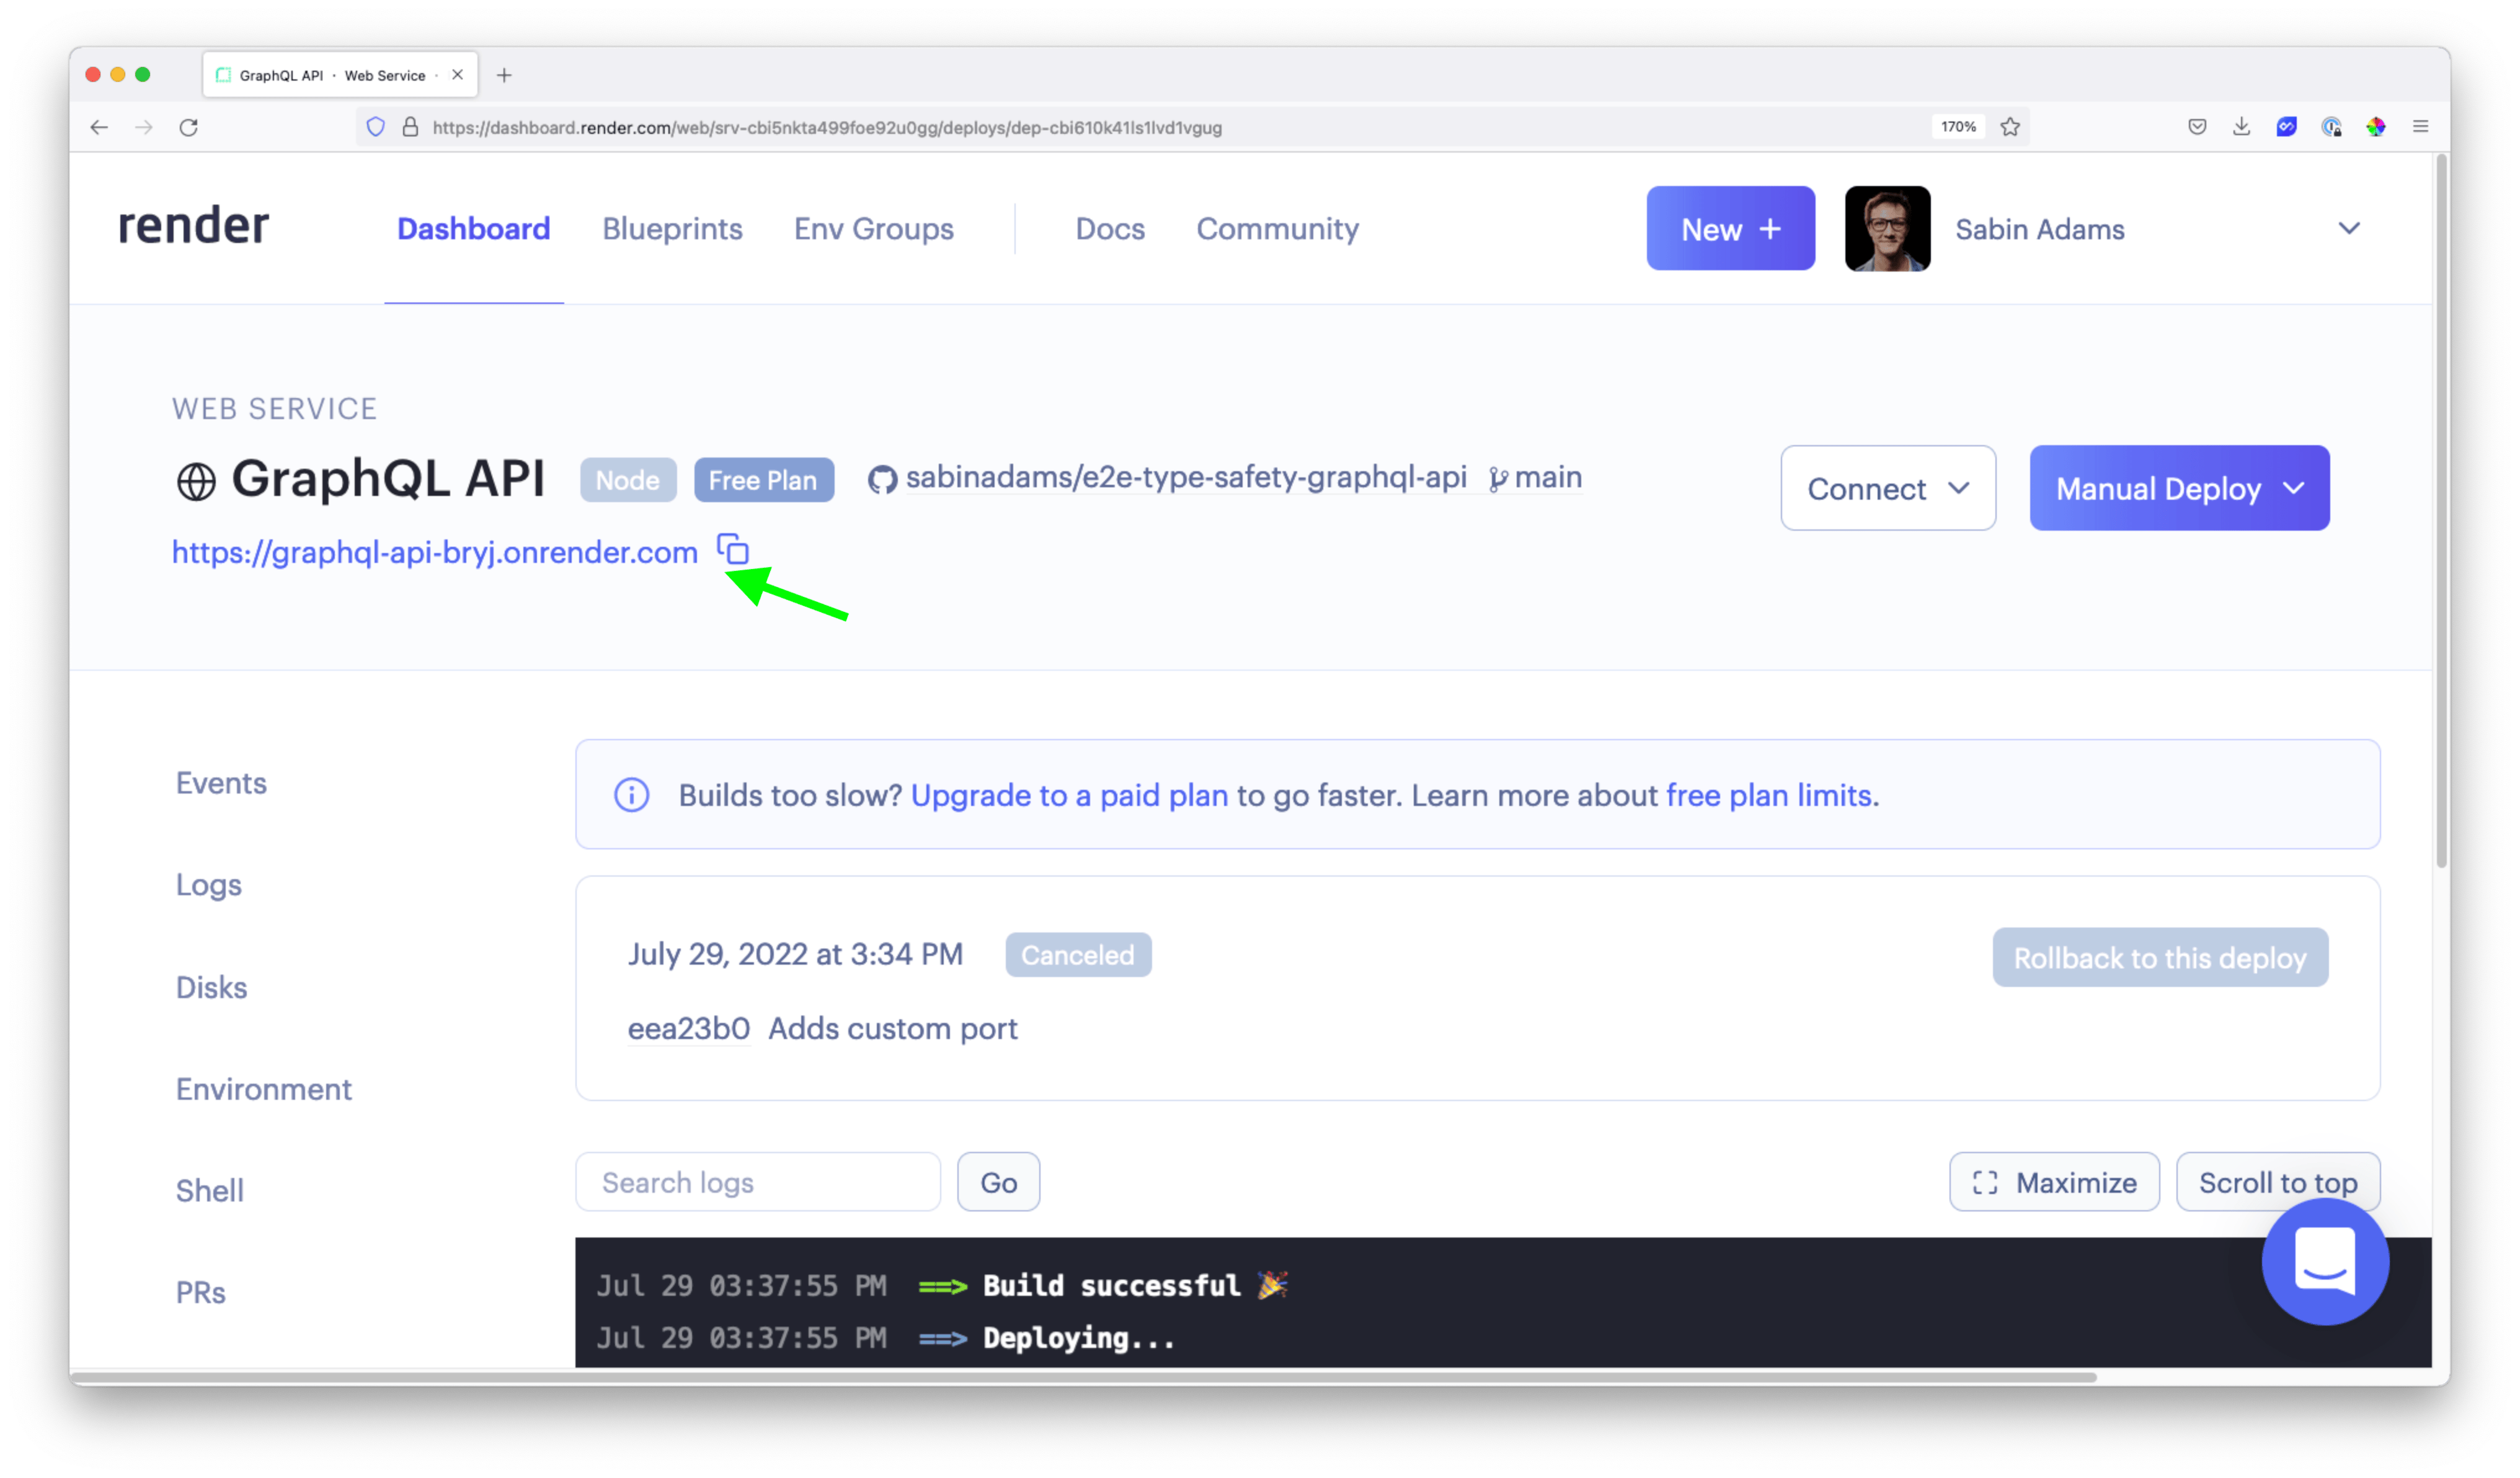
This will trigger the deployment process! Once that finishes deploying, you will be able to access the URL Render provides to see your GraphQL API.
Copy the URL from the location shown below and navigate to it in a new browser window at the /graphql route:
Deploy the React application
Now that your API is deployed, you will deploy your React application.
Head back over to the Render dashboard and hit the New button at the top of the page. Choose the Static Site option:
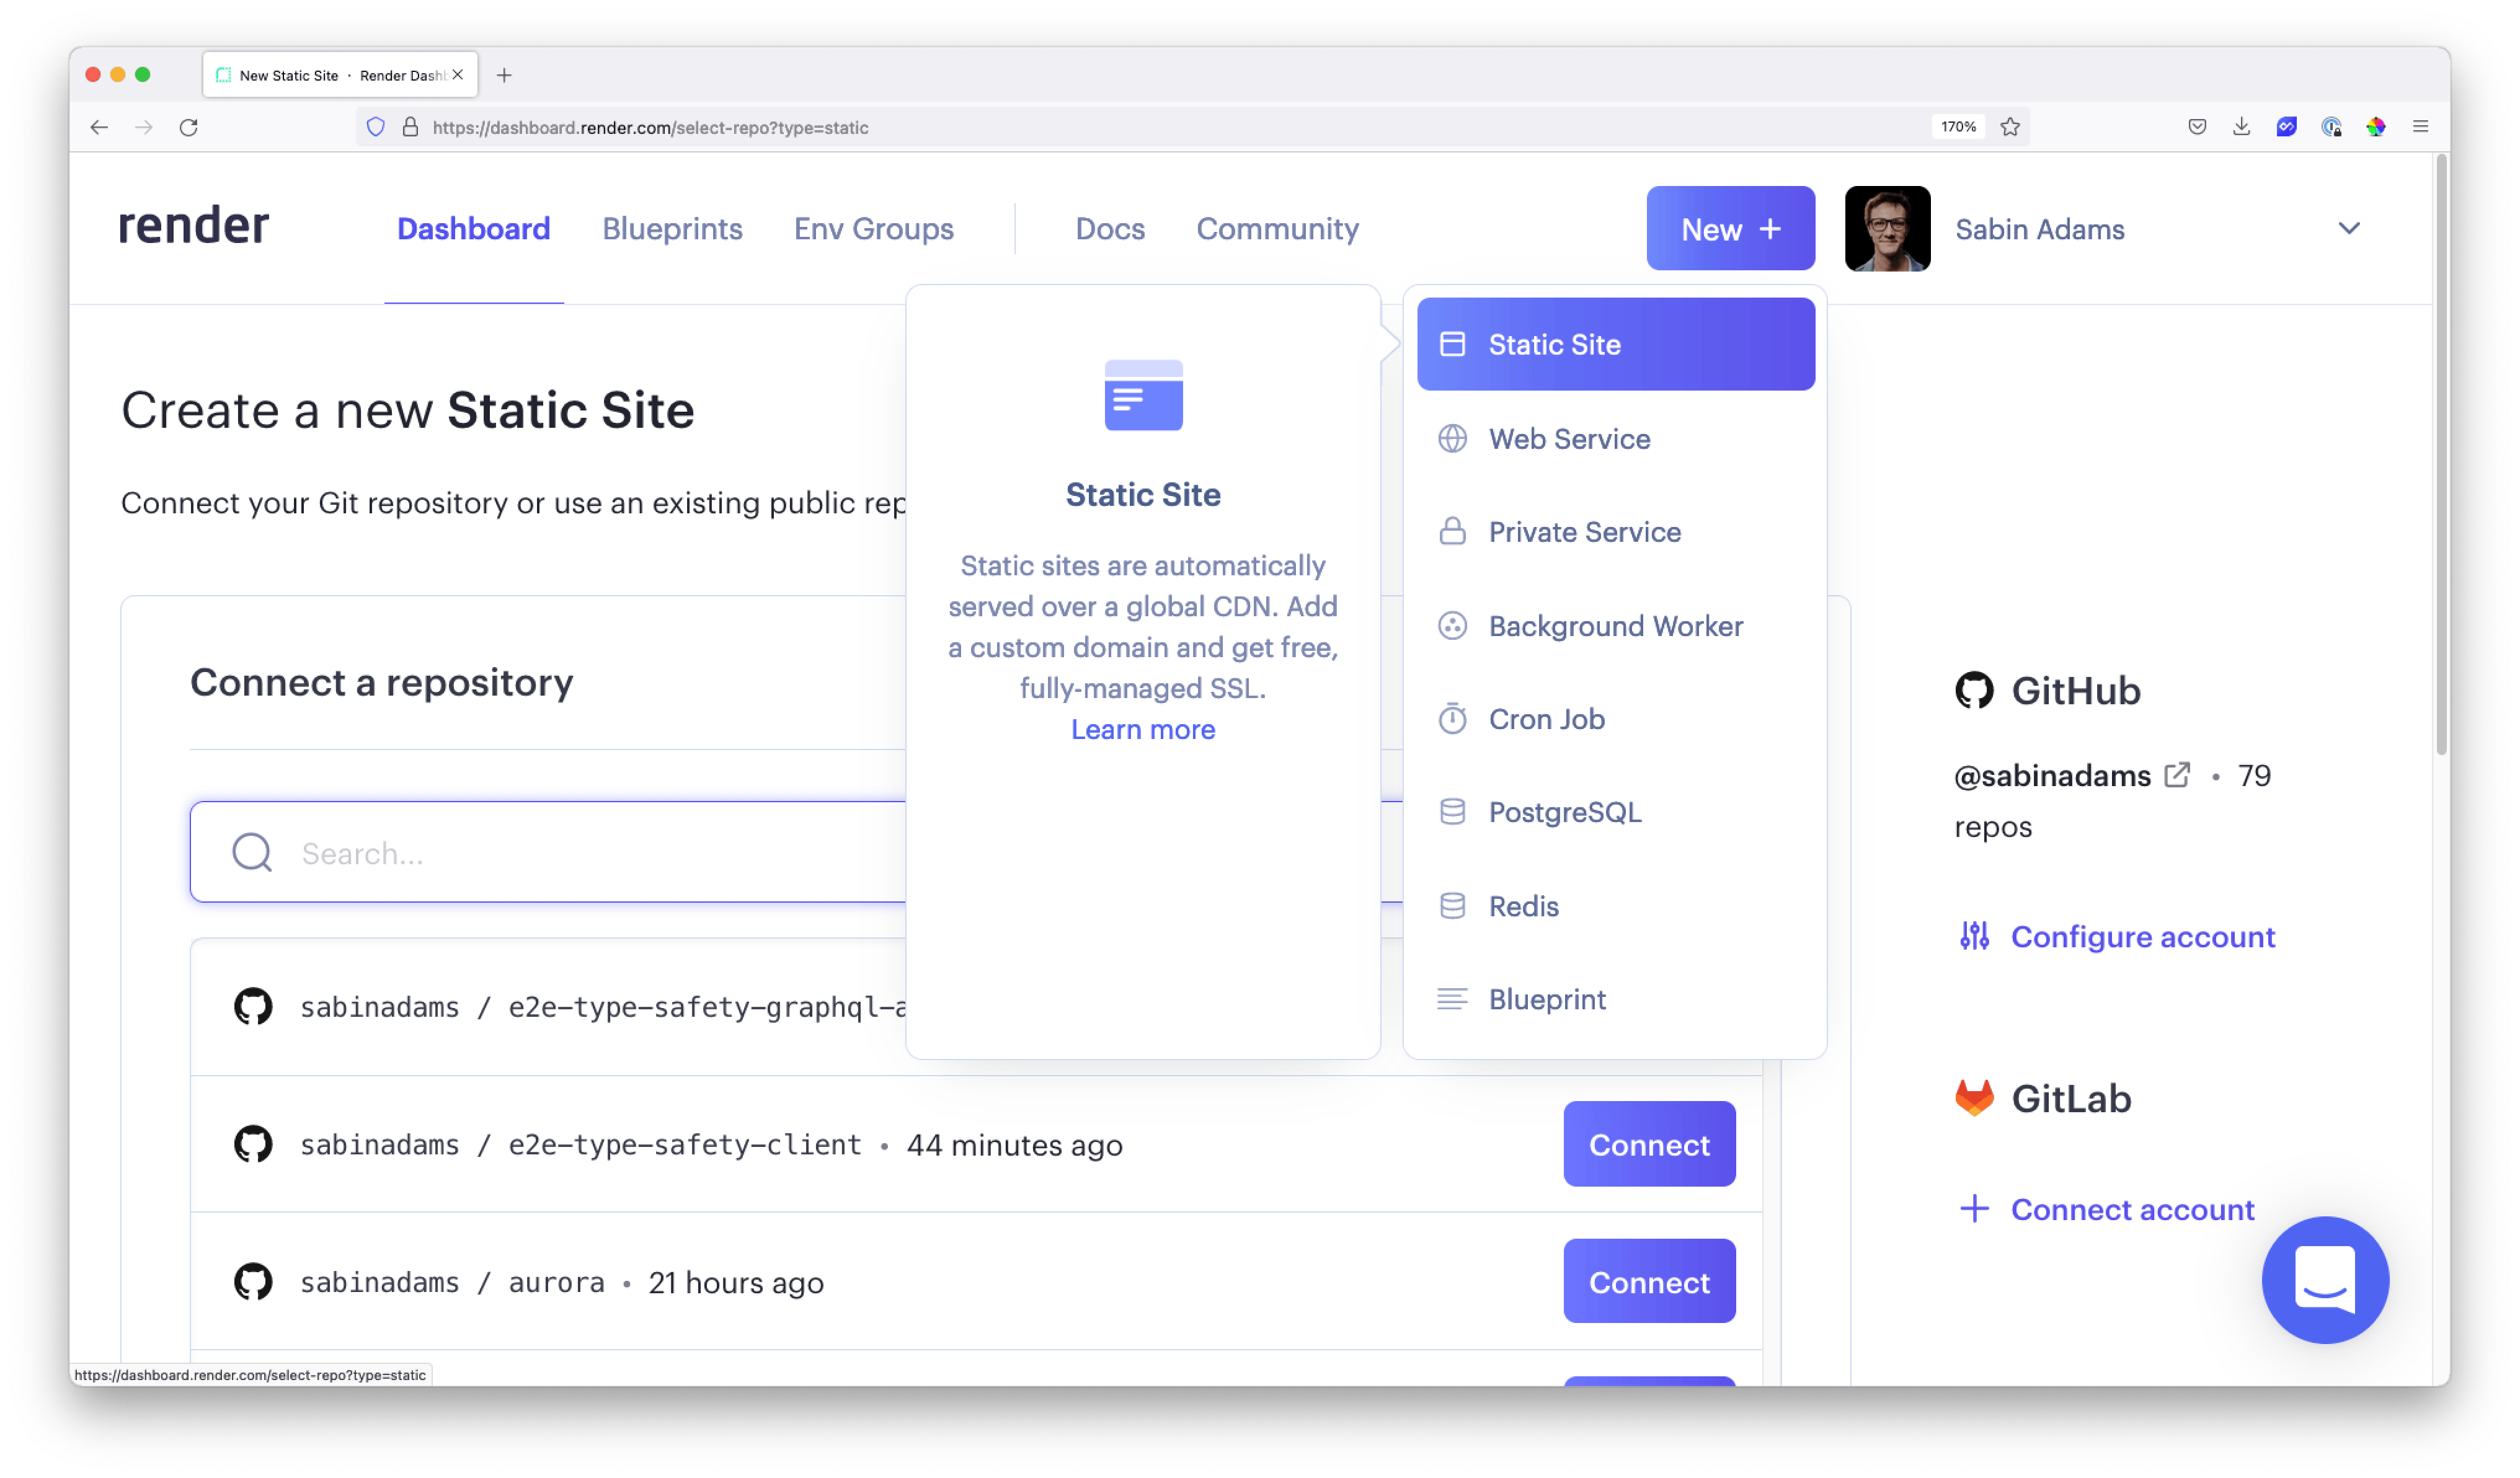
Connect this static site to your React application's Github repostory.
You will be prompted again to fill out some details for deploying this application:
- name: Pick any name you'd like
- Branch:
main - Build Command:
npm run build - Publish directory:
dist
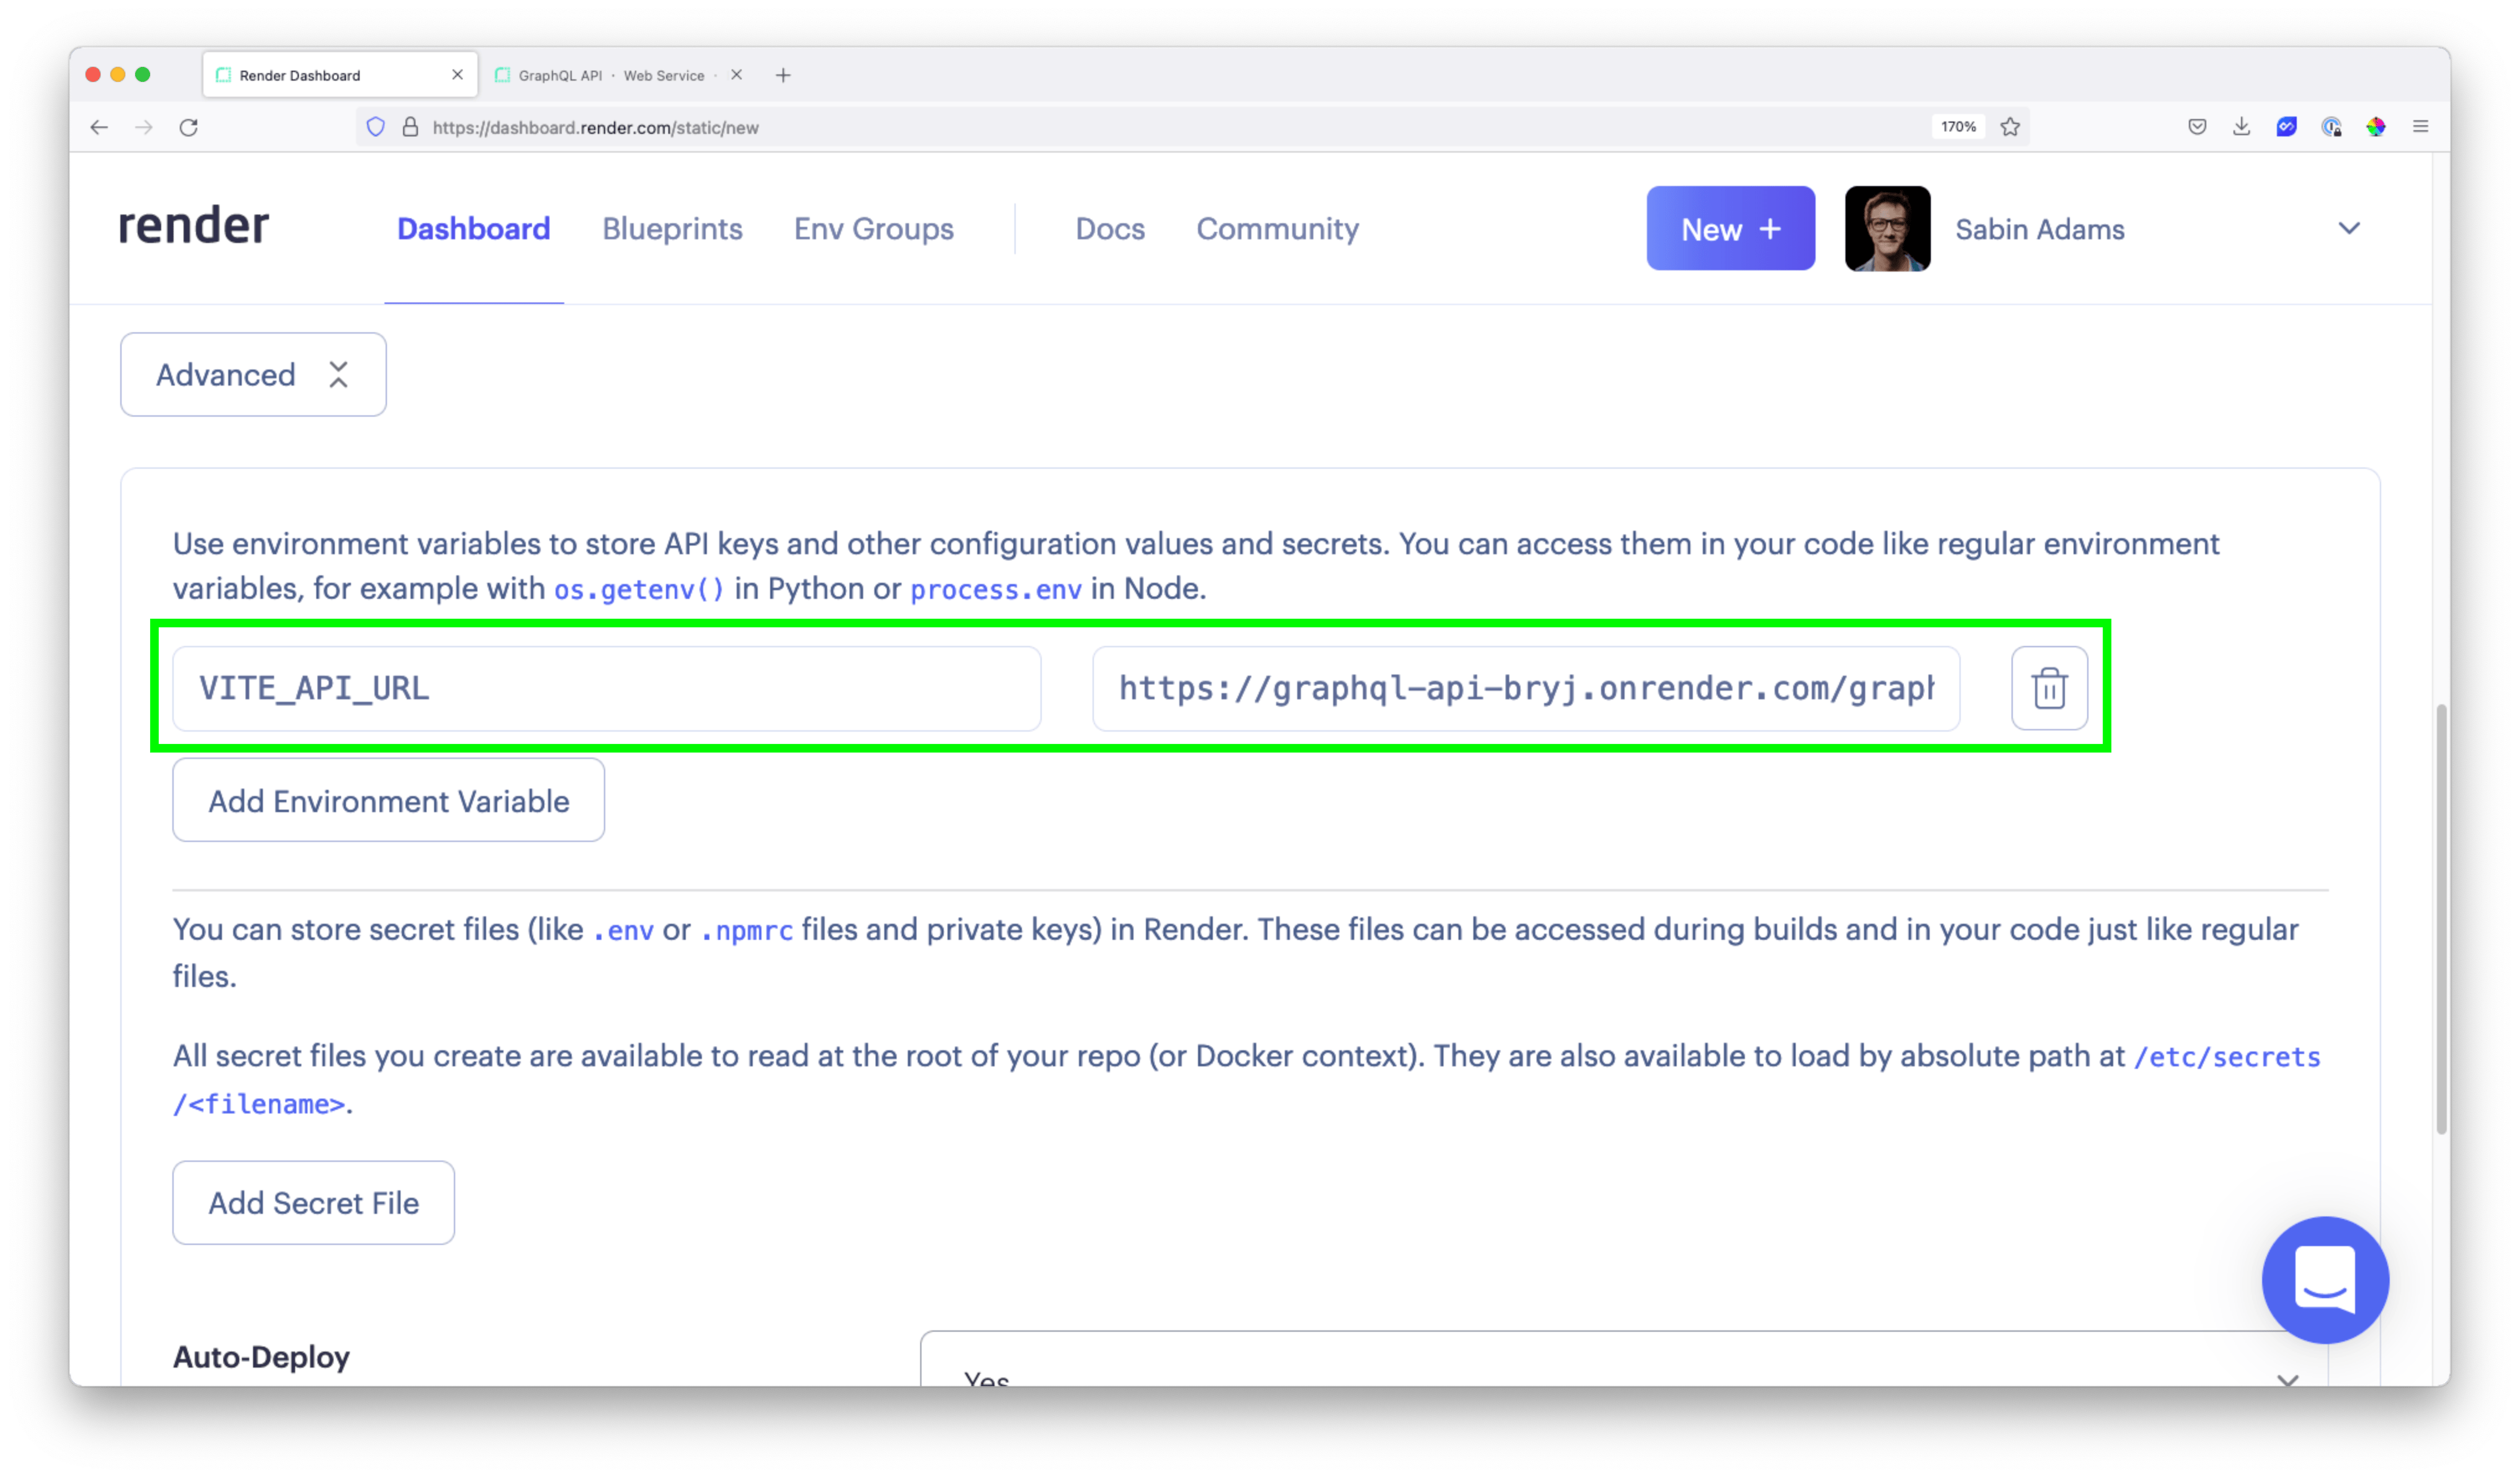
Under the Advanced section, add an environment variable named VITE_API_URL whose value is the URL of your deployed GraphQL API at the /graphql route. For example:
Finally, hit the Create Static Site button at the bottom of the page to deploy the application.
When that finishes deploying, head over to the URL available at the top of the page. If all went well, you should see your application is live!
Summary & Final thoughts
In this article, you finished up your application and deployed it! Along the way you:
- Set up GraphQL Codegen to keep your TypeScript types in sync across your entire stack
- Published both of your codebases to Github
- Deployed both of your applications using Render
In this series, you walked through every step of building a fully type-safe application using Prisma, GraphQL, and React as the main technologies. The power of all the tools you used combined is pretty amazing and allows you to build a scalable, safe application.
If you have any questions about anything covered in this series, please feel free to reach out to me on Twitter.
Build your next app with Prisma
Start free. Scale when you’re ready.